

How To: Next.js Drag-and-Drop Image Uploads Directly to S3 and Displaying with CloudFront
Including Terraform code for S3/CloudFront integration


In my first two tutorials on Next.js file uploads, we learned how to build a multiple file upload form in Next.js with drag-and-drop support and progress bars. Our files get stored in Amazon S3 but we aren't displaying the files anywhere on our page after the uploads are complete. In this tutorial, I'm going to change our multiple file uploader to only allow images to be uploaded and then we're going to display those images on our page using CloudFront and Amazon S3.
If you'd like to see the two previous articles, here they are:
And if you'd just like to see the source code for this tutorial, go here: https://github.com/danoph/file-uploader-demo/tree/story/cloudfront
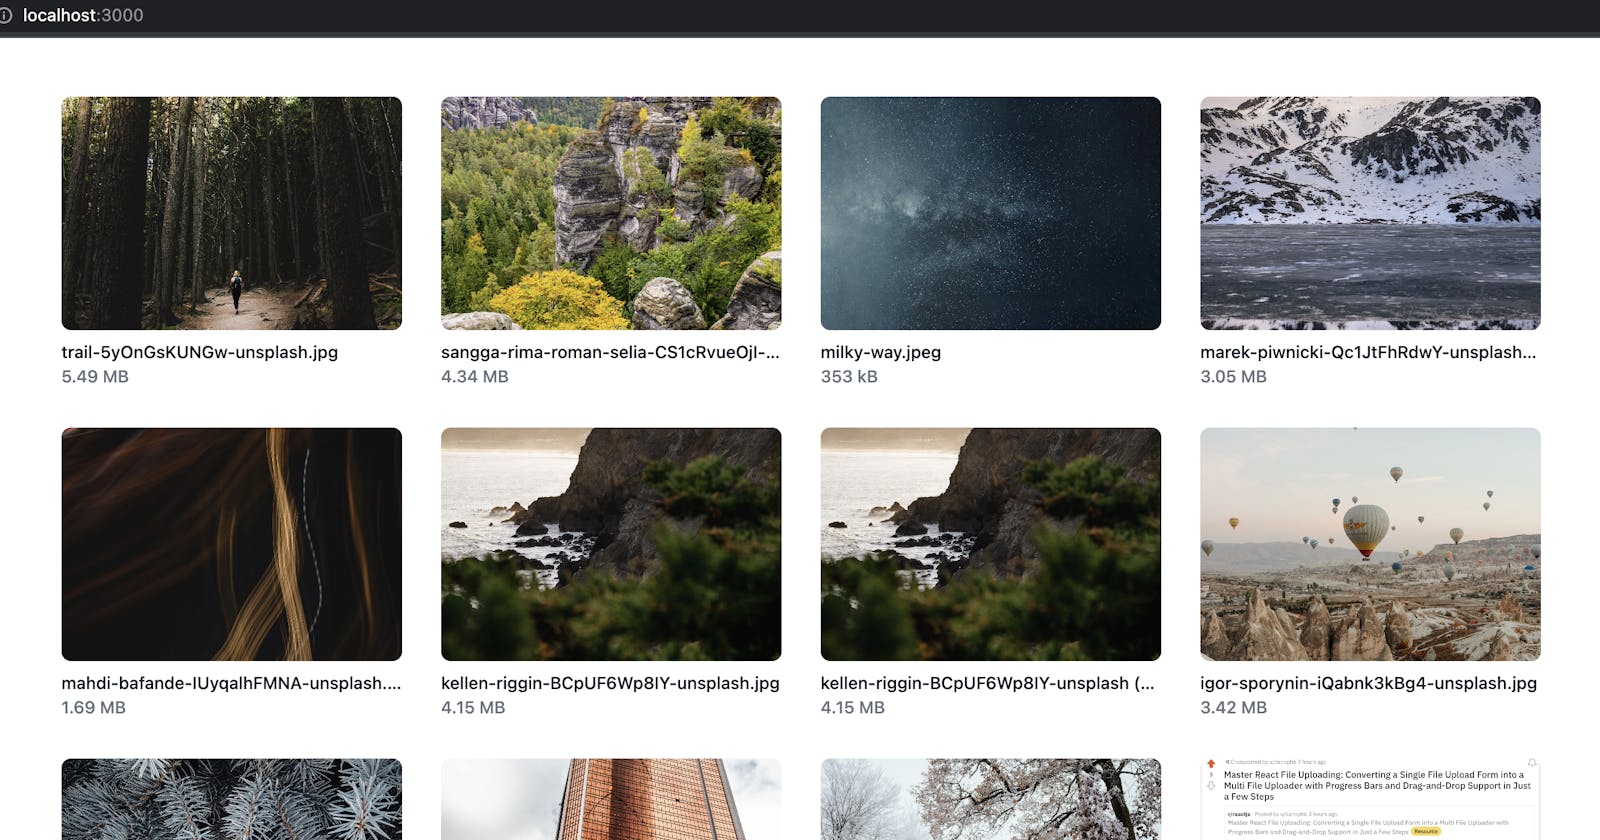
By the end of this article, your application will look like this and display images from your S3 bucket we set up previously:

We're going to start from the point we left off in the previous article, https://blog.danoph.com/turning-our-react-single-file-s3-direct-uploader-into-a-multi-file-uploader-adding-progress-bars-and-drag-and-drop-support.
Changing our file uploader to only allow images
Ok, let's start by modifying our form's file input to only allow image uploads:
// pages/index.tsx

<input
  id="file-upload"
  name="files"
  type="file"
  className="sr-only"
  onChange={onFilesChanged}
  multiple
  accept="image/*"
  value={inputValue}
/>
We should also check the mime type of the filename for our API endpoint in pages/api/multipart_uploads/index.ts and we'll introduce a third-party library called mime-types to help us out:
npm install mime-types
In pages/api/multipart_uploads/index.ts let's change our function to return an error if the upload is not an image:
// pages/api/multipart_uploads/index.ts

import type { NextApiRequest, NextApiResponse } from 'next'
import { createMultipartUpload } from '@/lib/s3';
import mime from 'mime-types';

export default async function handler(req, res) {
  const { filename } = req.body;

  if (mime.lookup(filename).match(/image\//)) {
    const { uploadId, fileKey } = await createMultipartUpload({ filename });

    res.status(201).json({
      uploadId,
      fileKey,
    });
  } else {
    res.status(422).json({
      message: "Upload must be an image"
    });
  }
}
Setting up our CloudFront CDN
To display our images, we need to serve them over the web through a publicly available URL. I'm not going to assume you have a custom domain name to work with, so we can just use the default URL when we create our CloudFront distribution. If you'd like to see me walk you through how to use a custom domain name with a CloudFront distribution leave a comment and I'll write an article on how to do that.
Since we already have Terraform set up which I walked you through in the first article (https://blog.danoph.com/how-to-upload-large-files-directly-to-amazon-s3-in-reactnextjs) new infrastructure changes are going to be a lot easier than using the AWS Console. If you haven't already set up Terraform and run through the first article, go do that now.
We already have our Amazon S3 bucket set up in Terraform, so now we need to add a CloudFront distribution to serve files from that S3 bucket:
# main.tf

resource "aws_s3_bucket_public_access_block" "uploads" {
  bucket = aws_s3_bucket.uploads.id

  block_public_acls       = true
  block_public_policy     = true
  ignore_public_acls      = true
  restrict_public_buckets = true
}

resource "aws_cloudfront_distribution" "uploads" {
  origin {
    domain_name              = aws_s3_bucket.uploads.bucket_regional_domain_name
    origin_id                = "file-uploader-demo"

    s3_origin_config {
      origin_access_identity = aws_cloudfront_origin_access_identity.uploads.cloudfront_access_identity_path
    }
  }

  enabled             = true

  default_cache_behavior {
    allowed_methods  = ["DELETE", "GET", "HEAD", "OPTIONS", "PATCH", "POST", "PUT"]
    cached_methods   = ["GET", "HEAD"]
    target_origin_id = "file-uploader-demo"

    forwarded_values {
      query_string = false

      cookies {
        forward = "none"
      }
    }

    viewer_protocol_policy = "allow-all"
    min_ttl                = 0
    default_ttl            = 3600
    max_ttl                = 86400
  }

  viewer_certificate {
    cloudfront_default_certificate = true
  }

  restrictions {
    geo_restriction {
      restriction_type = "none"
    }
  }
}

resource "aws_cloudfront_origin_access_identity" "uploads" {}

data "aws_iam_policy_document" "cloudfront_s3" {
  statement {
    actions   = ["s3:GetObject"]
    resources = ["${aws_s3_bucket.uploads.arn}/*"]

    principals {
      type        = "AWS"
      identifiers = [aws_cloudfront_origin_access_identity.uploads.iam_arn]
    }
  }
}

resource "aws_s3_bucket_policy" "uploads" {
  bucket = aws_s3_bucket.uploads.id
  policy = data.aws_iam_policy_document.cloudfront_s3.json
}

output "cloudfront_url" {
  value = aws_cloudfront_distribution.uploads.domain_name
}
Run terraform apply and note the cloudfront_url output that Terraform prints. We will need this when displaying our images and we also need to put this value in our next.config.js file to allow images coming from that domain:
/** @type {import('next').NextConfig} */
const nextConfig = {
  reactStrictMode: true,
  images: {
    remotePatterns: [
      {
        protocol: 'https',
        hostname: 'd1m5oohnuppcs9.cloudfront.net', // replace this with your cloudfront_url
      },
    ],
  },
}

module.exports = nextConfig
Since we changed the next.config.js file we will need to restart the server before being able to use Next.js Image in our code.
Creating an Image Gallery
Since we're using Tailwind CSS we can create a decent-looking image gallery without a ton of code and we get image optimization for free out of the box with Next.js. Let's add a new ImageGallery component to pages/index.tsx . We'll also need to add an import to the top of the file for next/image:
// pages/index.tsx

import Image from 'next/image';

const ImageGallery = ({ images }) => {
  return (
    <ul role="list" className="py-4 grid grid-cols-2 gap-x-4 gap-y-8 sm:grid-cols-3 sm:gap-x-6 lg:grid-cols-4 xl:gap-x-8">
      {images.map((image) => (
        <li key={image.source} className="relative">
          <div className="group h-48 aspect-w-10 aspect-h-7 block w-full overflow-hidden rounded-lg bg-gray-100 focus-within:ring-2 focus-within:ring-indigo-500 focus-within:ring-offset-2 focus-within:ring-offset-gray-100 relative">
            <Image
              src={image.source}
              fill
              sizes="(max-width: 768px) 100vw,
              (max-width: 1200px) 50vw,
              33vw"
              alt=""
              quality={100}
              className="pointer-events-none object-cover group-hover:opacity-75"
            />
            <button type="button" className="absolute inset-0 focus:outline-none">
              <span className="sr-only">View details for {image.title}</span>
            </button>
          </div>
          <p className="pointer-events-none mt-2 block truncate text-sm font-medium text-gray-900">{image.title}</p>
          <p className="pointer-events-none block text-sm font-medium text-gray-500">
            { prettyBytes(image.size) }
          </p>
        </li>
      ))}
    </ul>
  )
}
Next let's use our new ImageGallery component inside of our HomeComponent and add some state to keep track of images that we'll need to pass into the ImageGallery:
// pages/index.tsx

export default function Home() {
  const [images, setImages] = useState([]);
And add the ImageGallery to the inside of HomeComponent's view:
// pages/index.tsx

  return (
    <div className="mx-auto max-w-7xl sm:p-6 lg:p-8">
      <ImageGallery images={images} />
So your full HomeComponent should look like this:
// pages/index.tsx

export default function Home() {
  const [inputValue, setInputValue] = useState("");
  const [uploads, setUploads] = useState<FileUpload[]>([]);
  const [draggingOver, setDraggingOver] = useState(false);

  const [images, setImages] = useState([]);

  const updateProgress = (filename, percentage) => {
    setUploads(state =>
      state.map(fileUpload =>
        fileUpload.uploader.file.name === filename
        ? { ...fileUpload, progress: percentage }
        : fileUpload
      )
    );
  };

  const addFiles = files => {
    setUploads(
      files.map(file => ({
        uploader: new Uploader({ file })
        .onProgress(({ percentage }) => {
          updateProgress(file.name, percentage);
        })
        .onComplete((uploadResponse) => {
          console.log('upload complete', uploadResponse);
        })
        .onError((error) => {
          console.error('upload error', error)
        }),
        progress: 0
      }))
    );
  };

  const onFilesChanged = e => {
    const files = [ ...e.target.files ];
    addFiles(files);
  };

  const uploadClicked = () => {
    if (!uploads.length) { return }

    uploads.forEach(upload => upload.uploader.start());
  };

  const stopEvent = e => {
    e.preventDefault();
    e.stopPropagation();
  }

  const handleDragEnter = e => {
    stopEvent(e);
  };

  const handleDragLeave = e => {
    stopEvent(e);
    setDraggingOver(false);
  };

  const handleDragOver = e => {
    stopEvent(e);
    setDraggingOver(true);
  };

  const handleDrop = e => {
    stopEvent(e);
    setDraggingOver(false);
    const files = [ ...e.dataTransfer.files ];
    addFiles(files);
  };

  return (
    <div className="mx-auto max-w-7xl sm:p-6 lg:p-8">
      <ImageGallery images={images} />

      <div className="flex text-sm text-gray-600">
        <div className="w-full">
          <div
            className={`${draggingOver
              ? "border-blue-500"
              : "border-gray-300"
            } mt-1 flex items-center justify-center px-6 pt-5 pb-6 border-2 border-dashed rounded-md`}
            onDrop={handleDrop}
            onDragOver={handleDragOver}
            onDragEnter={handleDragEnter}
            onDragLeave={handleDragLeave}
          >
            <label
              htmlFor="file-upload"
              className="inline-flex items-center rounded border border-transparent bg-indigo-100 px-2.5 py-1.5 text-xs font-medium text-indigo-700 hover:bg-indigo-200 focus:outline-none focus:ring-2 focus:ring-indigo-500 focus:ring-offset-2"
            >
              <div className="text-md">
                Choose File
              </div>
              <input
                id="file-upload"
                name="files"
                type="file"
                className="sr-only"
                onChange={onFilesChanged}
                multiple
                accept="image/*"
                value={inputValue}
              />
            </label>
            <p className="pl-1 text-sm">or drag and drop</p>
          </div>
        </div>
      </div>

      <p className="py-2 text-sm text-gray-500">
        Any file up to 5TB
      </p>

      {uploads.map(({ uploader: { file }, progress }) => (
        <div key={file.name} className="py-2 flex flex-grow flex-col">
          <span className="text-sm font-medium text-gray-900">
            { file.name }
          </span>
          <span className="text-sm text-gray-500">
            { file.type }
          </span>
          <span className="text-sm text-gray-500">
            { prettyBytes(file.size) }
          </span>

          <UploadProgressBar
            progress={progress}
          />
        </div>
      ))}

      <button
        type="button"
        className="inline-flex items-center rounded-md border border-transparent bg-indigo-600 px-4 py-2 text-sm font-medium text-white shadow-sm hover:bg-indigo-700 focus:outline-none focus:ring-2 focus:ring-indigo-500 focus:ring-offset-2"
        onClick={uploadClicked}
      >
        Upload File
      </button>
    </div>
  )
}
If you haven't read my previous articles and are wondering what all the code is related to uploads, check out those articles first that I linked to at the top of the article.
Adding an API endpoint to fetch uploaded images
You might be wondering where our images are going to come from. Since we don't have a database yet, we can build a simple API endpoint to query files in our S3 bucket and return the images to the front end along with some metadata about the image like its filename, size, and CloudFront URL. Let's create pages/api/images.ts and add a handler function:
// pages/api/images.ts

import type { NextApiRequest, NextApiResponse } from 'next'
import { listBucketFiles } from '@/lib/s3';
import mime from 'mime-types';

export interface UploadedImage {
  title: string;
  source: string;
  size: number;
}

// the S3 Object field types are defined as string | null so we have to be a little defensive when using
// those objects in our TypeScript code

export default async function handler(req, res: NextApiResponse<UploadedImage[]>) {
  const images = (await listBucketFiles())
  .filter(s3File => mime.lookup(s3File?.Key || "").match(/image\//))
  .map(s3File => ({
    title: s3File.Key || "some image",
    source: `https://d1m5oohnuppcs9.cloudfront.net/${s3File.Key}`,
    size: s3File.Size || 0,
  }));

  res.status(200).json(images);
}
You'll need to replace d1m5oohnuppcs9.cloudfront.net with your cloudfront_url from the Terraform output from earlier.
Some things to note:
I created a new TypeScript interface
UploadedImagefor what we expect in the front-end code to populate theImageGallerycomponent.The Amazon javascript sdk v3 is a little cumbersome to work with because all the values for
s3Filecan be undefined. That's why I added defaults to thetitleandsizeproperties so TypeScript doesn't complain abouts3File.Keyands3File.Sizepossibly being undefined.I added a
filterto the array of objects coming back from S3 to skip files that aren't images.
You'll notice that we are referencing a function called listBucketFiles that we haven't defined yet, so let's fix that now in the lib/s3.ts file:
// lib/s3.ts

export const listBucketFiles = async () => {
  const response = await client.send(
    new ListObjectsCommand({
      Bucket: UPLOAD_BUCKET,
    })
  );

  return response?.Contents || [];
}
We'll also need to add ListObjectsCommand to the list of imports at the top of lib/s3.ts:
// lib/s3.ts

import {
    S3Client,
    CreateMultipartUploadCommand,
    UploadPartCommand,
    CompleteMultipartUploadCommand,
    ListObjectsCommand,
} from "@aws-sdk/client-s3";
Fetching the images from our new API Endpoint
Now that we have an API endpoint set up to fetch images from s3 and transform each s3 object into an UploadedImage we can modify our HomeComponent to fetch images from the API. Let's add axios to the top of pages/index.tsx first:
// pages/index.tsx

import axios from "axios"

const API_BASE_URL = "/api/";

const api = axios.create({
  baseURL: API_BASE_URL,
});
And then add a useEffect in our HomeComponent to fetch the images from our API endpoint:
// pages/index.tsx

  useEffect(() => {
    const fetchImages = async () => {
      const response = await api.request({
        url: `/images`,
        method: "GET",
      })

      setImages(response.data);
    };

    fetchImages();
  }, []);
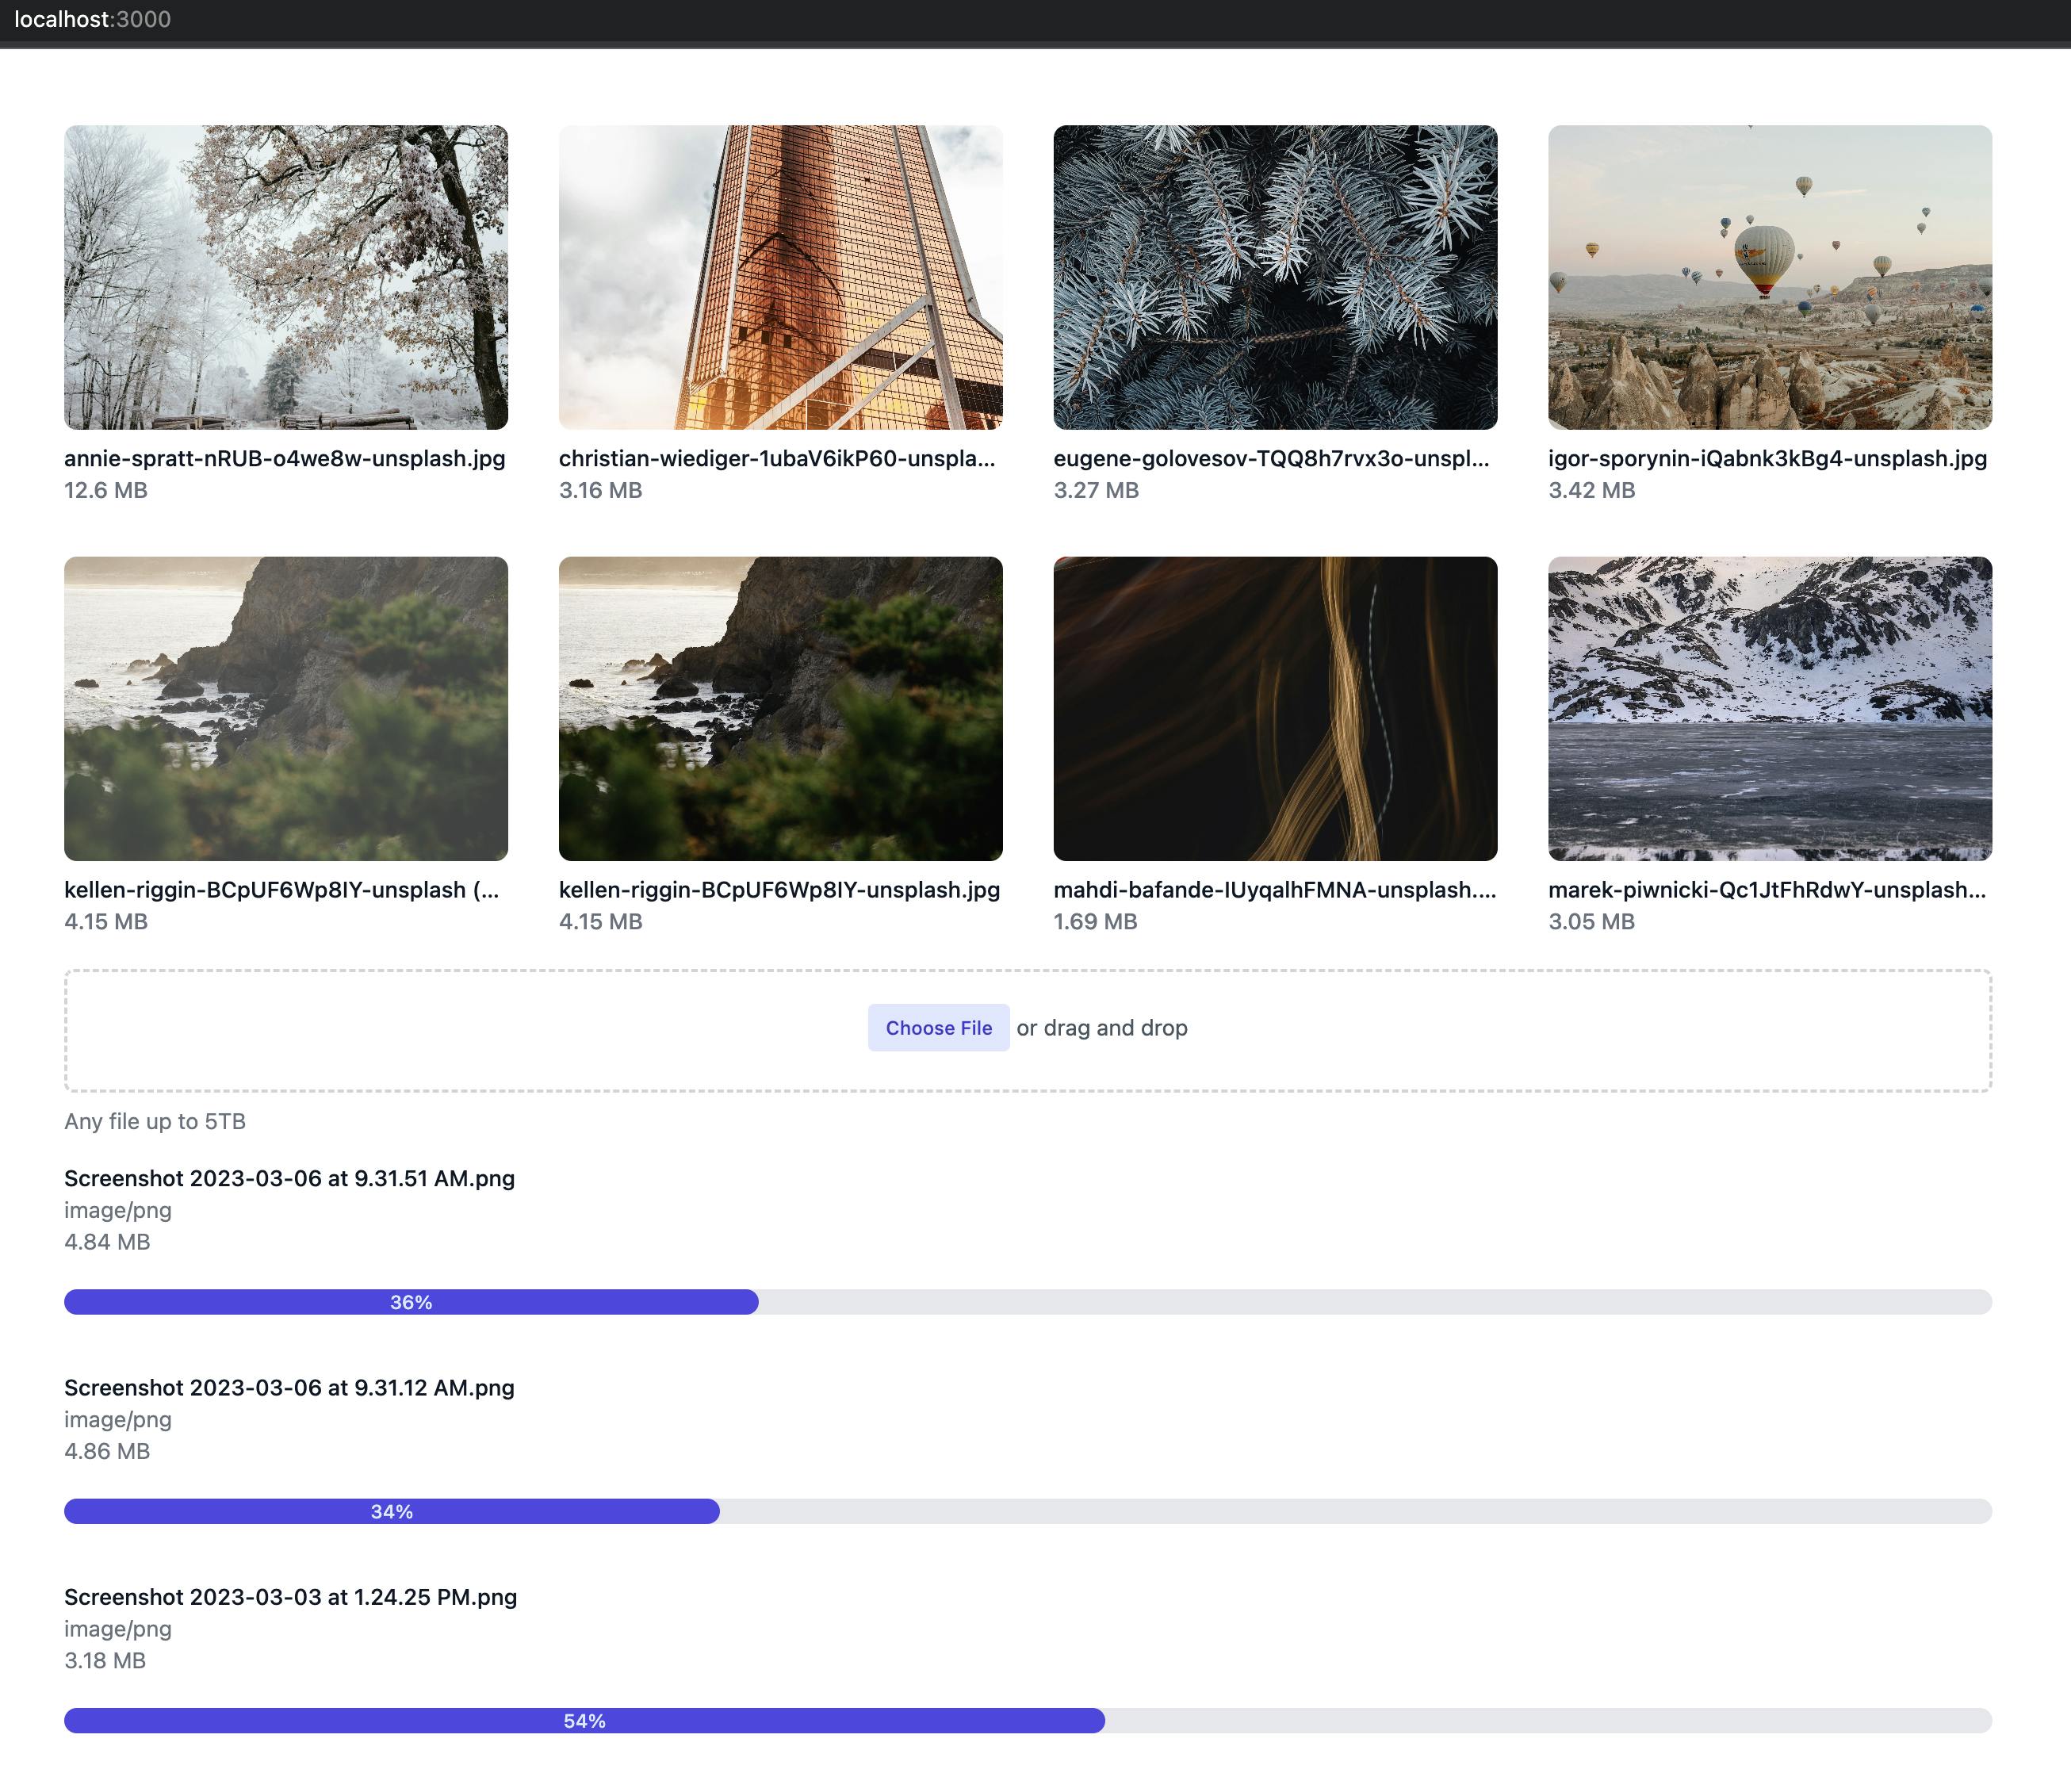
When you refresh the page you should now see images being displayed in the image gallery we just built:
Displaying images as they finish uploading
To display the images immediately after they're uploaded without refreshing the page, we'll need to modify our HomeComponent and the /api/multipart_uploads/[uploadId]/completions endpoint.
Let's start with the front end HomeComponent. After a file is done uploading, we want to take the response from the endpoint when an upload is finished and add that to our images array. Inside of addFiles where we are setting up our file uploads, change the onComplete function to this:
        .onComplete((newImage) => {
          setImages(state => [ newImage, ...state ]);
        })
TypeScript is going to complain that we didn't set a type for our images state so let's add a type to the array:
const [images, setImages] = useState<UploadedImage[]>([]);
We defined the UploadedImage interface in our pages/api/images.ts file but we are going to need it in another endpoint so let's create a new file lib/models.ts that can export this interface:
// lib/models.ts

export interface UploadedImage {
  title: string;
  source: string;
  size: number;
}
Then let's import UploadedImage so we can use it in our HomeComponent:
// pages/index.tsx

import { UploadedImage } from '@/lib/models';
Since we don't want to have this interface defined twice, remove the interface from pages/api/images.ts and add the same import statement to the top:
// pages/api/images.ts

import { UploadedImage } from '@/lib/models';
Now let's modify our endpoint that gets called when an upload is finished to complete the multipart upload so it returns an UploadedImage to the Next.js component:
// pages/api/multipart_uploads/[uploadId]/completions.ts

import type { NextApiRequest, NextApiResponse } from 'next'
import { getS3ObjectMetadata, finishMultipartUpload } from '@/lib/s3';
import { UploadedImage } from '@/lib/models';

export default async function handler(req, res: NextApiResponse<UploadedImage>) {
  const { uploadId } = req.query;
  const { fileKey, parts } = req.body;

  const finishResponse = await finishMultipartUpload({
    fileKey,
    uploadId,
    parts
  });

  const objectMetadata = await getS3ObjectMetadata({ filename: fileKey });

  res.status(200).json({
    title: finishResponse.Key || "",
    source: `https://d1m5oohnuppcs9.cloudfront.net/${finishResponse.Key}`,
    size: objectMetadata.ContentLength || 0,
  });
}
Some things to note:
There is one minor problem with the
CompleteMultipartUploadCommandbecause it does not return the size of the file as part of the response. That is why I am adding a newgetS3ObjectMetadatafunction tolib/s3.tsto get the file size that I will show you in a minute.The endpoint returns the same
UploadedImageas thepages/api/images.tsendpoint.You'll need to replace
d1m5oohnuppcs9.cloudfront.netabove with yourcloudfront_urlthat we got a few steps earlier.
Now, let's add getS3ObjectMetadata to lib/s3.ts:
export const getS3ObjectMetadata = async ({ filename }) => {
  const response = await client.send(
    new HeadObjectCommand({
      Bucket: UPLOAD_BUCKET,
      Key: filename,
    })
  );

  return response;
}
We'll also need to import HeadObjectCommand so let's add that to the functions we are importing from @aws-sdk/client-s3:
import {
    S3Client,
    CreateMultipartUploadCommand,
    UploadPartCommand,
    CompleteMultipartUploadCommand,
    ListObjectsCommand,
    HeadObjectCommand,
} from "@aws-sdk/client-s3";
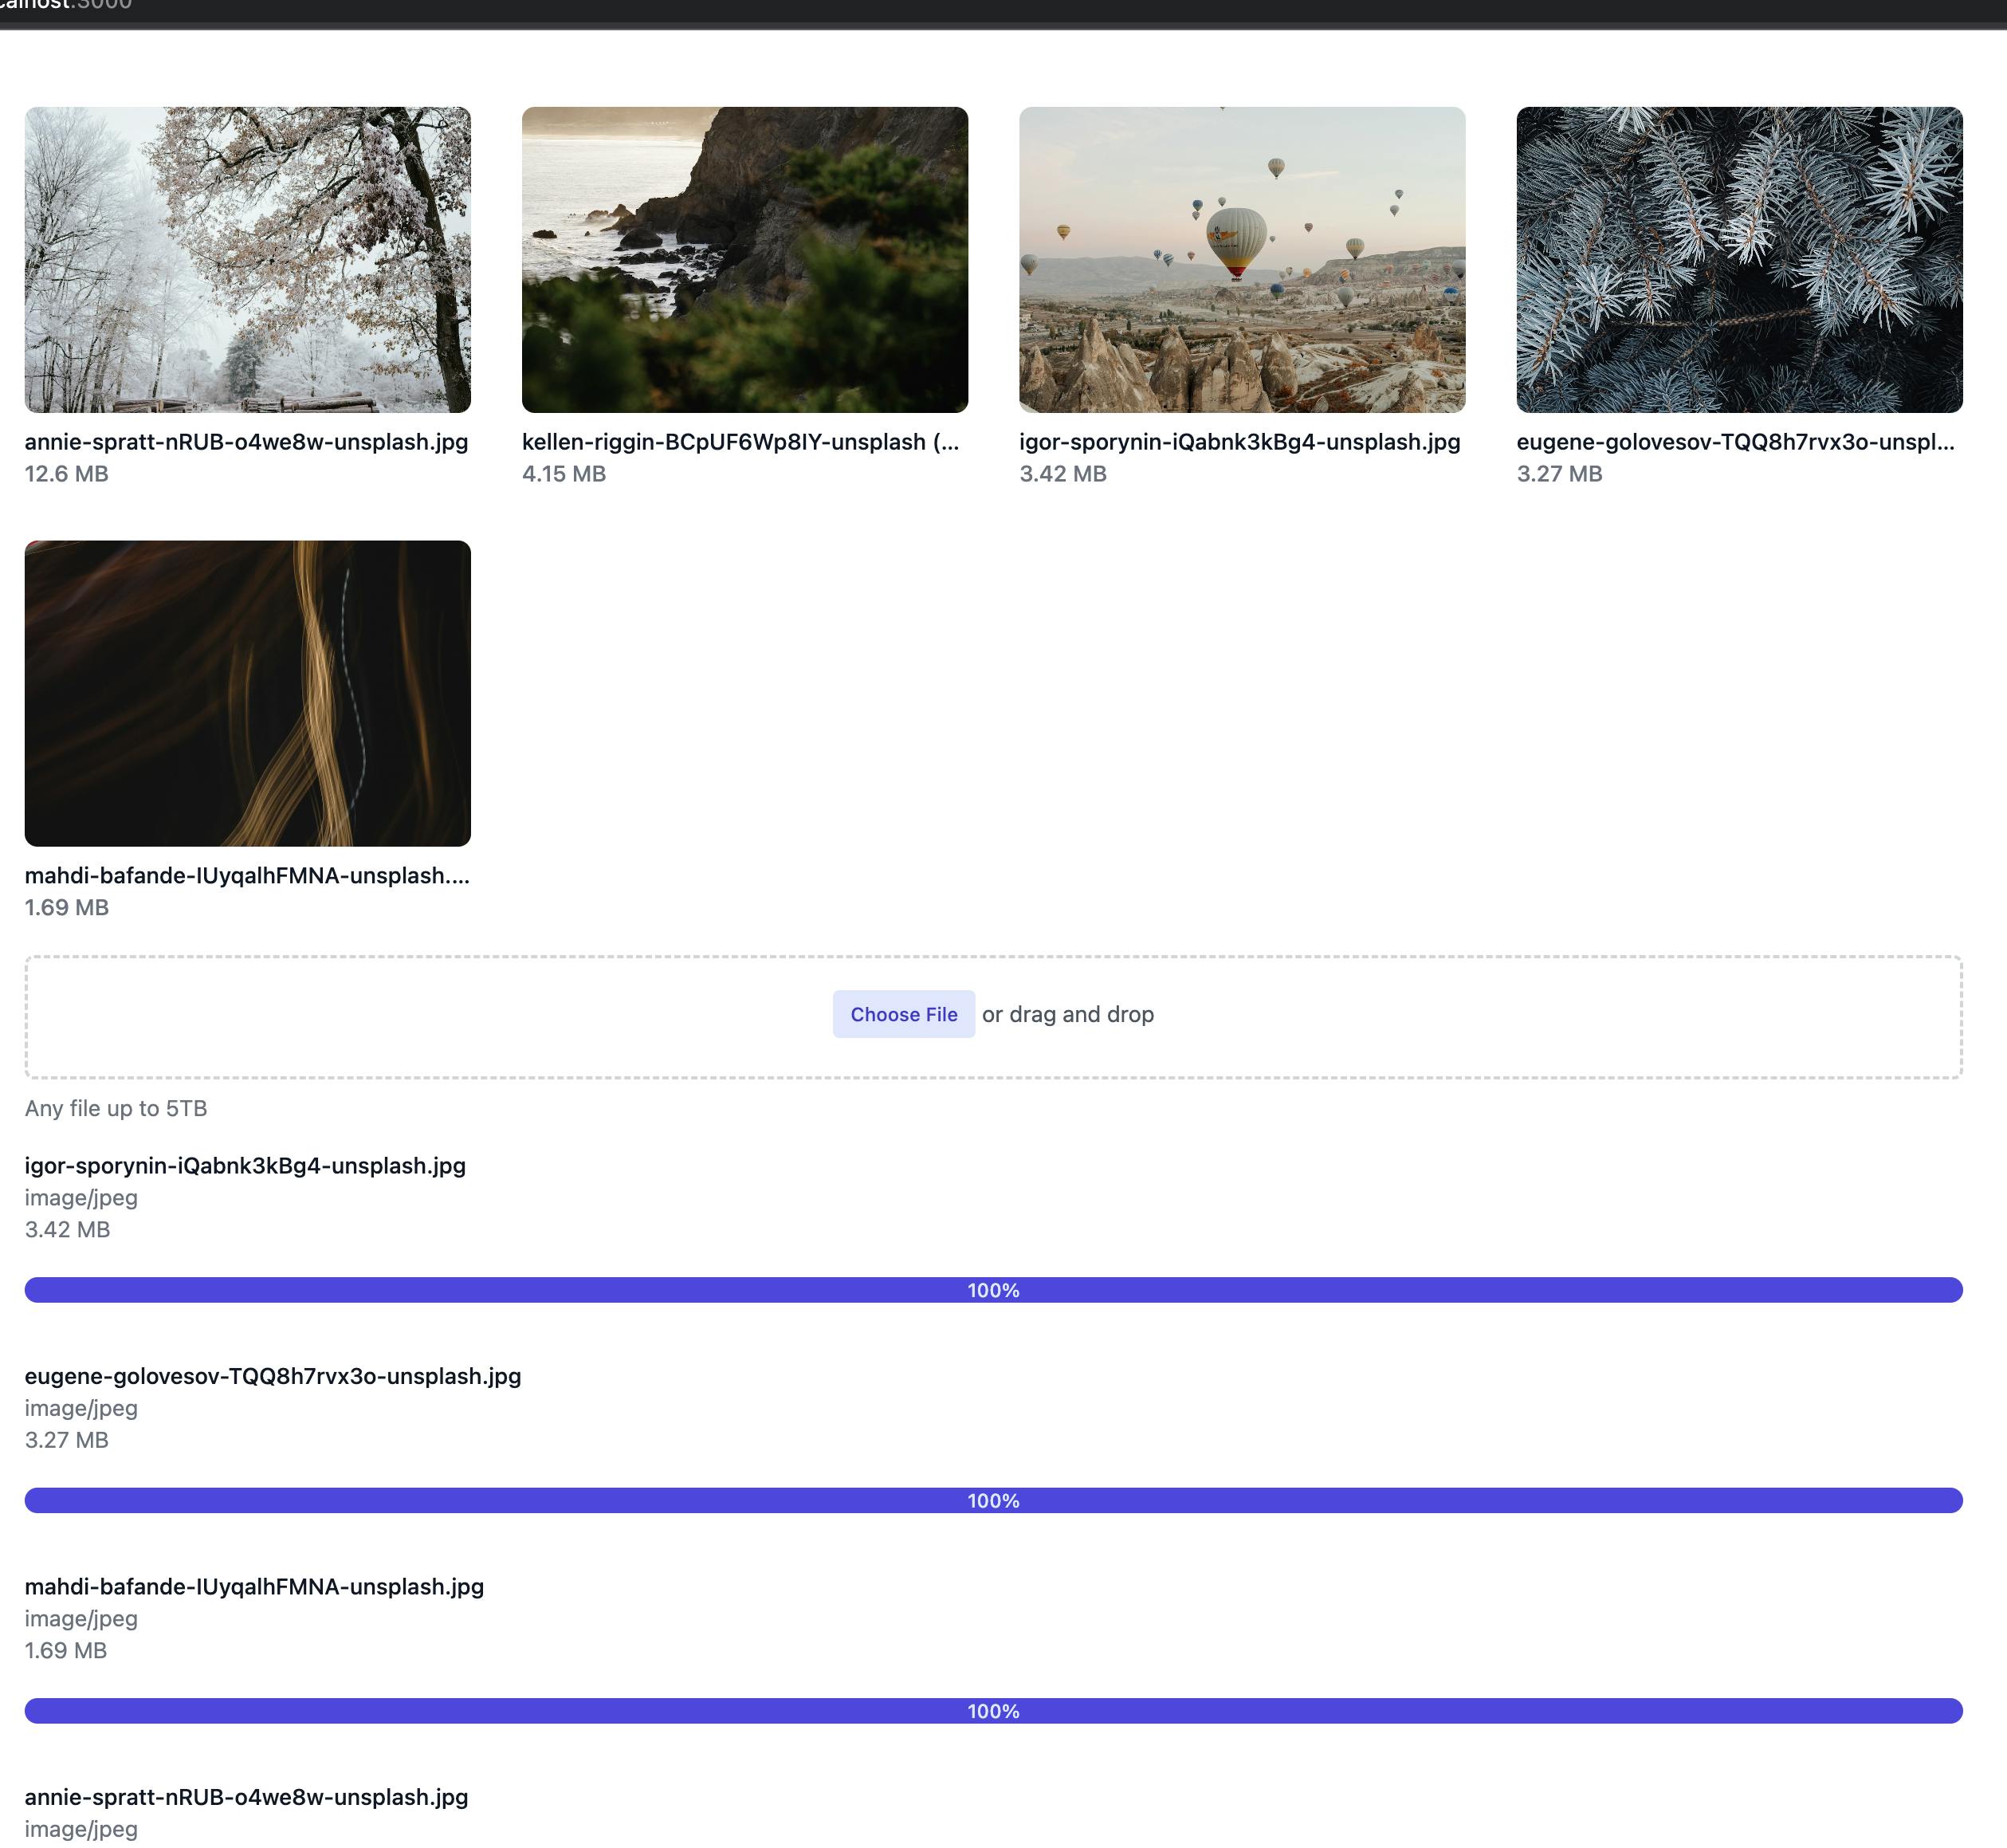
Now when you upload images they will each get added as they are finished as the first item in the image gallery:
Let me know if have any questions in the comments!
If you want to see the full source code for this tutorial go here: https://github.com/danoph/file-uploader-demo/tree/story/cloudfront