How to Upload Large Files Directly to Amazon S3 in React/Next.js
And deploying to Vercel

If you've ever needed to upload large files over 5 gigabytes to Amazon S3, you will run into a road block pretty quickly. Using multipart chunked file uploads is the way to get around that. Also, if you've built a file uploader before, you have to make the decision of whether the file upload should proxy through your API backend or go directly to S3. Proxying through your API backend is simpler to set up but has some drawbacks, such as tying up a server process during the file upload, and having to handle the file on the server's file system before sending it over to a file storage system like S3. It is also usually a lot slower than uploading directly to S3.
Uploading directly to s3 still requires some type of backend that can create presigned S3 URLs for the web front end since you don't want the front end being able to generate those on its own. Next.js provides a convenient way of doing that with API endpoints you can create that get deployed as edge functions.
In this tutorial, we are going to create a simple file uploader from scratch in Next.js using Tailwind CSS and TypeScript. We will also be using terraform to set up the necessary AWS resources to store the files we are uploading. We will also be deploying this app to Vercel. It sounds like a lot of moving parts but you can have everything working by following the steps in this tutorial in less than an hour.
The full source code for this application is here: https://github.com/danoph/file-uploader-demo
Create a new Next.js app with TypeScript:
npx create-next-app@latest file-uploader-demo --typescript --eslint
cd file-uploader-demo
Install Tailwind CSS:
Full instructions are here: https://tailwindcss.com/docs/guides/nextjs
npm install -D tailwindcss postcss autoprefixer
npx tailwindcss init -p
I chose not to use the "src" directory or the experimental "app" directory in the prompts when setting up NextJS. So, we will need to change the tailwind.config.js file slightly:
/** @type {import('tailwindcss').Config} */
module.exports = {
  content: [
    "./pages/**/*.{js,ts,jsx,tsx}",
    "./components/**/*.{js,ts,jsx,tsx}",
  ],
  theme: {
    extend: {},
  },
  plugins: [],
}
In the styles/globals.css file, we want to remove the default NextJS styling and replace it with some tailwind modules, as well as a small styling hack that most of the TailwindUI templates need:
@tailwind base;
@tailwind components;
@tailwind utilities;

#__next {
  @apply flex flex-col h-full;
  // some tailwind templates need this line instead:
  // min-height: 100%;
}
Run the app locally:
npm run dev
Edit the main pages/index.tsx file and replace it with a simple Tailwind CSS component to make sure everything's working:
export default function Home() {
  return (
    <h1 className="text-3xl font-bold underline">
      Hello world!
    </h1>
  )
}
When you visit the page in your browser the text should be large and underlined. I'm also going to add "noImplicitAny": false to the tsconfig.json file to get rid of annoying "No implicit any" TypeScript warnings and "downlevelIteration": true for a convenience function I'm using in a library we will see later in the article. So your tsconfig.json file should look like this:
{
  "compilerOptions": {
    "target": "es5",
    "lib": ["dom", "dom.iterable", "esnext"],
    "allowJs": true,
    "skipLibCheck": true,
    "strict": true,
    "forceConsistentCasingInFileNames": true,
    "noEmit": true,
    "esModuleInterop": true,
    "module": "esnext",
    "moduleResolution": "node",
    "downlevelIteration": true,
    "noImplicitAny": false,
    "resolveJsonModule": true,
    "isolatedModules": true,
    "jsx": "preserve",
    "incremental": true,
    "baseUrl": ".",
    "paths": {
      "@/*": ["./*"]
    }
  },
  "include": ["next-env.d.ts", "**/*.ts", "**/*.tsx"],
  "exclude": ["node_modules"]
}
Time to create the uploader
There are a few moving pieces to this part. We will need an upload form (the easy part) and 3 separate endpoints in our Next.js app to handle:
POST /api/multipart_uploads
Creating a "multipart upload" for S3. This gives you a unique file ID for the upload.POST /api/multipart_uploads/{fileId}/part_url
Since we might be uploading large files, we want to split up the upload into separate chunks, so for each individual chunk, we need to generate a pre-signed URL for that chunk.POST /api/multipart_uploads/{fileId}/completions
When all of the parts have been uploaded, we "complete" the multipart upload and AWS stitches together all of the chunks that we uploaded into a single file.
I am also going to use an Uploader TypeScript class that I found here: (https://github.com/pilovm/multithreaded-uploader/blob/master/frontend/uploader.js). I had to modify the Uploader to call our Next.js API endpoints that we will be making and also to overcome an obstacle with the original uploader that does not account for pre-signed URLs expiring if an upload takes longer than the expiration timeout for each multipart upload chunk URL. The class also uses axios so we need to add that library to our project:
npm i axios
Here is my uploader class that I modified to work with our Next.js app. Let's make a folder called lib and we will put this Uploader class in lib/Uploader.ts:
// lib/Uploader.ts

import axios from "axios"

const API_BASE_URL = "/api/";

const api = axios.create({
  baseURL: API_BASE_URL,
});

interface Part {
  ETag: string
  PartNumber: number
}

interface IOptions {
  chunkSize?: number;
  threadsQuantity?: number;
  file: File;
}

// original source: https://github.com/pilovm/multithreaded-uploader/blob/master/frontend/uploader.js
export class Uploader {
  chunkSize: number;
  threadsQuantity: number;
  file: File;
  aborted: boolean;
  uploadedSize: number;
  progressCache: any;
  activeConnections: any;
  parts: any[];
  uploadedParts: any[];
  uploadId: string | null;
  fileKey: string | null;
  onProgressFn: (progress) => void;
  onErrorFn: (err) => void;
  onCompleteFn: (response) => void;

  constructor(options: IOptions) {
    // this must be bigger than or equal to 5MB,
    // otherwise AWS will respond with:
    // "Your proposed upload is smaller than the minimum allowed size"
    this.chunkSize = options.chunkSize || 1024 * 1024 * 5
    // number of parallel uploads
    this.threadsQuantity = Math.min(options.threadsQuantity || 5, 15)
    this.file = options.file
    this.aborted = false
    this.uploadedSize = 0
    this.progressCache = {}
    this.activeConnections = {}
    this.parts = []
    this.uploadedParts = []
    this.uploadId = null
    this.fileKey = null
    this.onProgressFn = (progress) => console.log('progress', progress);
    this.onErrorFn = (err) => console.log('err', err);
    this.onCompleteFn = (response) => console.log('response', response);
  }

  start() {
    this.initialize()
  }

  async initialize() {
    try {
      const { data: { uploadId, fileKey } } = await api.request({
        url: "/multipart_uploads",
        method: "POST",
        data: {
          filename: this.file.name,
        },
      })

      this.uploadId = uploadId;
      this.fileKey = fileKey;

      const numberOfParts = Math.ceil(this.file.size / this.chunkSize)

      this.parts.push(
        ...[...Array(numberOfParts).keys()].map((val, index) => ({
          PartNumber: index + 1
        }))
      );

      this.sendNext();
    } catch (error) {
      await this.complete(error)
    }
  }

  sendNext() {
    const activeConnections = Object.keys(this.activeConnections).length

    if (activeConnections >= this.threadsQuantity) {
      return
    }

    if (!this.parts.length) {
      if (!activeConnections) {
        this.complete()
      }

      return;
    }

    const part = this.parts.pop();

    if (this.file && part) {
      const sentSize = (part.PartNumber - 1) * this.chunkSize
      const chunk = this.file.slice(sentSize, sentSize + this.chunkSize)

      const sendChunkStarted = () => {
        this.sendNext()
      }

      this.sendChunk(chunk, part, sendChunkStarted)
        .then(() => {
          this.sendNext()
        })
        .catch((error) => {
          this.parts.push(part)
          this.complete(error)
        })
    }
  }

  // terminating the multipart upload request on success or failure
  async complete(error: unknown | undefined = null) {
    if (error && !this.aborted) {
      this.onErrorFn(error)
      return
    }

    if (error) {
      this.onErrorFn(error)
      return
    }

    try {
      const response = await this.sendCompleteRequest()
      this.onCompleteFn(response);
    } catch (error) {
      this.onErrorFn(error)
    }
  }

  // finalizing the multipart upload request on success by calling
  // the finalization API
  async sendCompleteRequest() {
    if (this.uploadId && this.fileKey) {
      const response = await api.request({
        url: `/multipart_uploads/${this.uploadId}/completions`,
        method: "POST",
        data: {
          fileKey: this.fileKey,
          parts: this.uploadedParts,
        },
      })

      return response.data;
    }
  }

  sendChunk(chunk, part, sendChunkStarted): Promise<void> {
    return new Promise((resolve, reject) => {
      this.upload(chunk, part, sendChunkStarted)
        .then((status) => {
          if (status !== 200) {
            reject(new Error("Failed chunk upload"))
            return
          }

          resolve()
        })
        .catch((error) => {
          reject(error)
        })
    })
  }

  // calculating the current progress of the multipart upload request
  handleProgress(part, event) {
    //console.log('part', part, 'event', event);
    if (this.file) {
      if (event.type === "progress" || event.type === "error" || event.type === "abort") {
        this.progressCache[part] = event.loaded
      }

      if (event.type === "uploaded") {
        this.uploadedSize += this.progressCache[part] || 0
        delete this.progressCache[part]
      }

      const inProgress = Object.keys(this.progressCache)
        .map(Number)
        .reduce((memo, id) => (memo += this.progressCache[id]), 0)

      const sent = Math.min(this.uploadedSize + inProgress, this.file.size)

      const total = this.file.size

      const percentage = Math.round((sent / total) * 100)

      this.onProgressFn({
        sent: sent,
        total: total,
        percentage: percentage,
      })
    }
  }

  upload(file, part, sendChunkStarted) {
    return new Promise(async (resolve, reject) => {
      if (this.uploadId && this.fileKey) {
        // we need to get the multipart chunk url immediately before starting the upload
        // since creating them beforehand may result in the urls expiring
        const { data: { signedUrl } } = await api.request({
          url: `/multipart_uploads/${this.uploadId}/part_url`,
          method: "POST",
          data: {
            fileKey: this.fileKey,
            partNumber: part.PartNumber,
          }
        })

        // - 1 because PartNumber is an index starting from 1 and not 0
        const xhr = (this.activeConnections[part.PartNumber - 1] = new XMLHttpRequest())

        sendChunkStarted()

        const progressListener = this.handleProgress.bind(this, part.PartNumber - 1)

        xhr.upload.addEventListener("progress", progressListener)

        xhr.addEventListener("error", progressListener)
        xhr.addEventListener("abort", progressListener)
        xhr.addEventListener("loadend", progressListener)

        xhr.open("PUT", signedUrl)

        xhr.onreadystatechange = () => {
          if (xhr.readyState === 4 && xhr.status === 200) {
            // retrieving the ETag parameter from the HTTP headers
            const ETag = xhr.getResponseHeader("etag")

            if (ETag) {
              const uploadedPart = {
                PartNumber: part.PartNumber,
                // removing the " enclosing carachters from
                // the raw ETag
                ETag: ETag.replaceAll('"', ""),
              }

              this.uploadedParts.push(uploadedPart)

              resolve(xhr.status)
              delete this.activeConnections[part.PartNumber - 1]
            }
          }
        }

        xhr.onerror = (error) => {
          console.log('xhr error', error);
          reject(error)
          delete this.activeConnections[part.PartNumber - 1]
        }

        xhr.onabort = () => {
          console.log('xhr abort');
          reject(new Error("Upload canceled by user"))
          delete this.activeConnections[part.PartNumber - 1]
        }

        xhr.send(file)
      }
    })
  }

  onProgress(onProgress) {
    this.onProgressFn = onProgress
    return this
  }

  onComplete(onComplete) {
    this.onCompleteFn = onComplete
    return this
  }

  onError(onError) {
    this.onErrorFn = onError
    return this
  }

  abort() {
    Object.keys(this.activeConnections)
      .map(Number)
      .forEach((id) => {
        this.activeConnections[id].abort()
      })

    this.aborted = true
  }
}
After adding this file, let's create an upload form and wire up the front end to use this new Uploader class.
// pages/index.tsx

import { useState } from 'react';
import { Uploader } from '@/lib/Uploader';

export default function Home() {
  const [inputValue, setInputValue] = useState("");
  const [upload, setUpload] = useState<Uploader | null>(null);

  const onFileChanged = e => {
    const file = [ ...e.target.files ][0];
    const uploader = new Uploader({ file })
    .onProgress(({ percentage }) => {
      console.log('upload progress', percentage);
    })
    .onComplete((uploadResponse) => {
      console.log('upload complete', uploadResponse);
    })
    .onError((error) => {
      console.error('upload error', error)
    });

    setUpload(uploader);

    uploader.start();
  };

  return (
    <div className="mx-auto max-w-7xl sm:p-6 lg:p-8">
      <div className="flex text-sm text-gray-600">
        <label
          htmlFor="file-upload"
          className="inline-flex items-center rounded-md border border-transparent bg-indigo-600 px-4 py-2 text-sm font-medium text-white shadow-sm hover:bg-indigo-700 focus:outline-none focus:ring-2 focus:ring-indigo-500 focus:ring-offset-2"
        >
          <div className="text-lg">
            Upload a file
          </div>
          <input
            id="file-upload"
            name="files"
            type="file"
            className="sr-only"
            onChange={onFileChanged}
            value={inputValue}
          />
        </label>
      </div>

      <p className="py-2 text-sm text-gray-500">
        Any file up to 5TB
      </p>
    </div>
  )
}
Your page should look like this:

Now we need to add those 3 endpoints for creating a multipart upload, creating a multipart part upload url, and completing the multipart upload. We will need to add two npm packages to our project: @aws-sdk/client-s3 and @aws-sdk/s3-request-presigner:
npm i @aws-sdk/client-s3 @aws-sdk/s3-request-presigner
To simplify creating our 3 endpoints, I've created a few TypeScript functions that will assist us. We will put this file in lib/s3.ts:
// lib/s3.ts

import {
    S3Client,
    CreateMultipartUploadCommand,
    UploadPartCommand,
    CompleteMultipartUploadCommand,
} from "@aws-sdk/client-s3";
import { getSignedUrl } from "@aws-sdk/s3-request-presigner";

const REGION = process.env.bucket_region;
const UPLOAD_BUCKET = process.env.upload_bucket;

// NOTE: these are named differently than the normal AWS_ACCESS_KEY_ID and AWS_SECRET_ACCESS_KEY
// because Vercel does not allow you to set those environment variables for a deployment
const client = new S3Client({
  region: REGION,
  credentials: {
    accessKeyId: `${process.env.access_key_id}`,
    secretAccessKey: `${process.env.access_key_secret}`,
  }
});

export const createMultipartUpload = async ({ filename }) => {
  const { Key, UploadId } = await client.send(
    new CreateMultipartUploadCommand({
      Bucket: UPLOAD_BUCKET,
      Key: filename,
      ACL: "private",
    })
  );

  return {
    uploadId: UploadId,
    fileKey: Key,
  }
}

export const createMultipartUploadPart = async ({ fileKey, uploadId, partNumber }) => {
  const command = new UploadPartCommand({
    Bucket: UPLOAD_BUCKET,
    Key: fileKey,
    UploadId: uploadId,
    PartNumber: partNumber,
  });

  const signedUrl = await getSignedUrl(
    client as any, // avoiding typescript lint errors
    command as any, // avoiding typescript lint errors
    {
      expiresIn: 3600,
    }
  );

  return {
    signedUrl
  }
}

export const finishMultipartUpload = async ({ fileKey, uploadId, parts }) => {
  const response = await client.send(
    new CompleteMultipartUploadCommand({
      Bucket: UPLOAD_BUCKET,
      Key: fileKey,
      UploadId: uploadId,
      MultipartUpload: {
        Parts: parts.sort((a, b) => {
          if (a.PartNumber < b.PartNumber) {
            return -1;
          }

          if (a.PartNumber > b.PartNumber) {
            return 1;
          }

          return 0;
        })
      }
    })
  );

  return response;
};
Now we can create our endpoints that will end up using these functions. Let's start with creating the multipart upload. We can try and keep this as RESTful as possible by creating the folder pages/api/multipart_uploads and then creating an index.ts file within that folder. This will handle creating the multipart upload:
// pages/api/multipart_uploads/index.ts

import type { NextApiRequest, NextApiResponse } from 'next'
import { createMultipartUpload } from '@/lib/s3';

export default async function handler(req, res) {
  const { filename } = req.body;
  const { uploadId, fileKey } = await createMultipartUpload({ filename });

  res.status(201).json({
    uploadId,
    fileKey,
  });
}
Next, let's create the endpoint for creating a multipart upload chunk url. Let's make a folder called [uploadId] inside the multipart_uploads folder and name the file part_url.ts:
// pages/api/multipart_uploads/[uploadId]/part_url.ts

import type { NextApiRequest, NextApiResponse } from 'next'
import { createMultipartUploadPart } from '@/lib/s3';

export default async function handler(req, res) {
  const { uploadId } = req.query;
  const { fileKey, partNumber } = req.body;

  const { signedUrl } = await createMultipartUploadPart({
    fileKey,
    uploadId,
    partNumber
  });

  res.status(201).json({
    signedUrl
  });
}
And finally let's create the endpoint for completing a multipart upload in pages/api/multipart_uploads/[uploadId]/completions.ts:
// pages/api/multipart_uploads/[uploadId]/completions.ts

import type { NextApiRequest, NextApiResponse } from 'next'
import { finishMultipartUpload } from '@/lib/s3';

export default async function handler(req, res) {
  const { uploadId } = req.query;
  const { fileKey, parts } = req.body;

  const response = await finishMultipartUpload({
    fileKey,
    uploadId,
    parts
  });

  res.status(200).json({});
}
These endpoints will not work out of the box because we need to set up our S3 bucket. Let's start writing some Terraform!
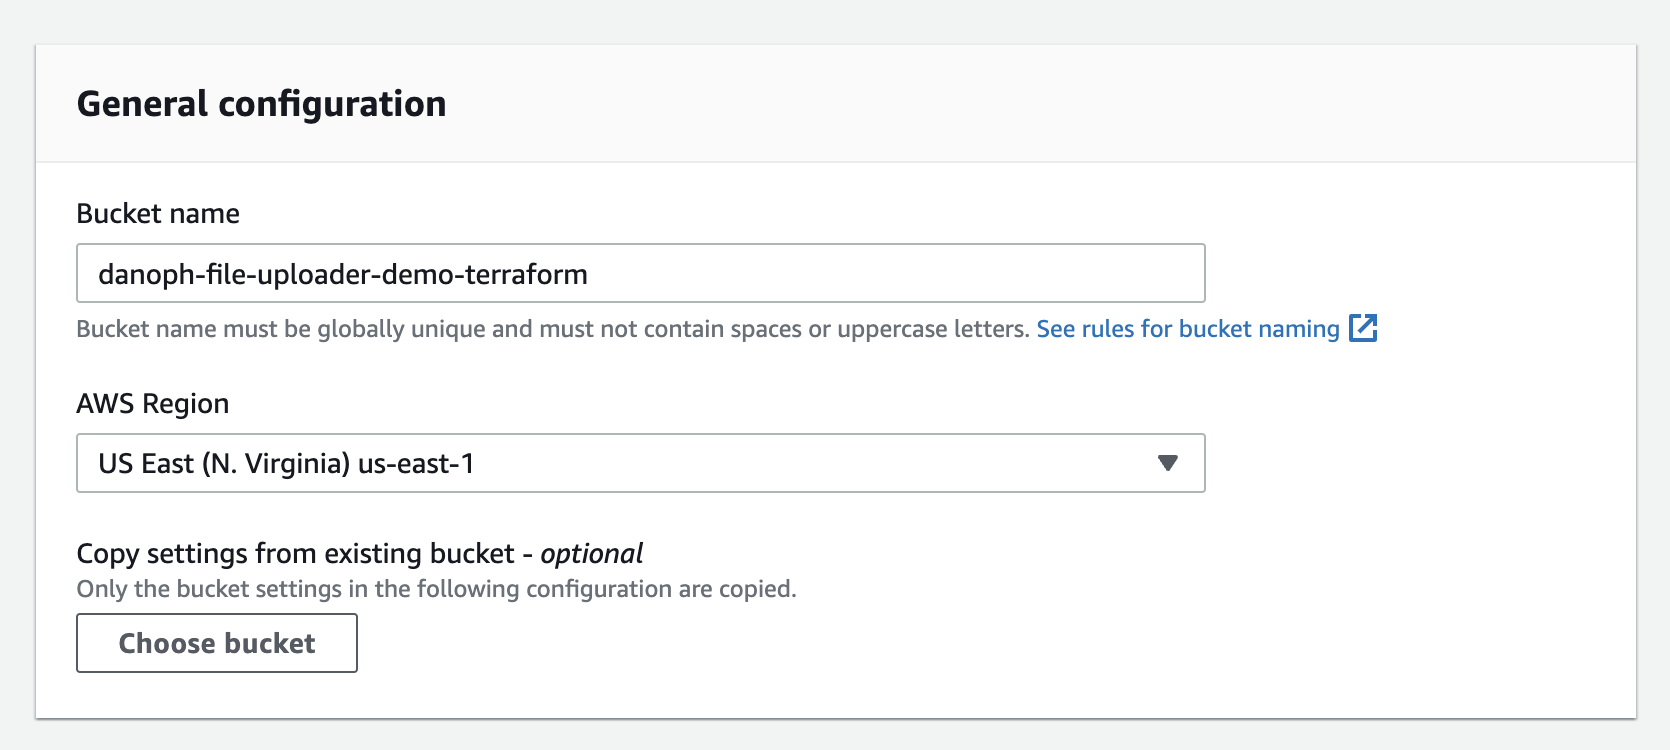
In order to create terraform for our new app, we need to manually create an s3 bucket that will house our terraform config. So, go into S3 in the AWS Console (https://aws.amazon.com) and create a new bucket and make sure Object Versioning is enabled. Since S3 bucket names have to be unique across all of AWS, I usually put my username or the app domain in the front of the bucket name to ensure it's unique. Don't use dots in the name of the bucket because that has other consequences that we don't want to run into for this tutorial. So, for example, for this application I am going to name my bucket danoph-file-uploader-demo-terraform and pick us-east-1 for the region.

In order to run terraform locally, make sure you have Terraform installed. On MacOS you can run brew install terraform or use tfenv if you want to manage multiple versions. Make sure the version you are using is near 1.3.8, which is the latest version as of this writing. You can check your version by running terraform version
Also, you need to make sure you have programmatic access to AWS. If you are logged in as the root user in your AWS account, you can click on your name in the top right, and then click Security Credentials. Under the Access Keys section, click on Create access key. Make sure to download these credentials since you will only see them once. If you are more familiar with AWS, you probably know giving the root AWS user isn't the most secure thing to do. The more secure way to do this would be to create a new IAM user that we will use to run terraform locally, and restricting access to only the certain resources we need to manage in AWS. That is outside the scope of this article so I'm going to assume you have created your access key and secret and now you need to put them in your ~/.bash_profile or ~/.zshrc file.
export AWS_ACCESS_KEY_ID="{value here}"
export AWS_SECRET_ACCESS_KEY="{value here}"
Make sure after adding these values to resource your ~/.zshrc or ~/.bash_profile by running . ~/.zshrc or . ~/.bash_profile.
Now that you have credentials set up, let's create some boilerplate terraform inside a main.tf file:
# main.tf

terraform {
  required_providers {
    aws = {
      source = "hashicorp/aws"
      version = "4.39.0"
    }
  }
}

terraform {
  backend "s3" {
    bucket = "danoph-file-uploader-demo-terraform"
    key    = "terraform.tfstate"
    region = "us-east-1"
  }
}
You'll need to replace danoph-file-uploader-demo-terraform with the bucket you just created manually to house our terraform state.
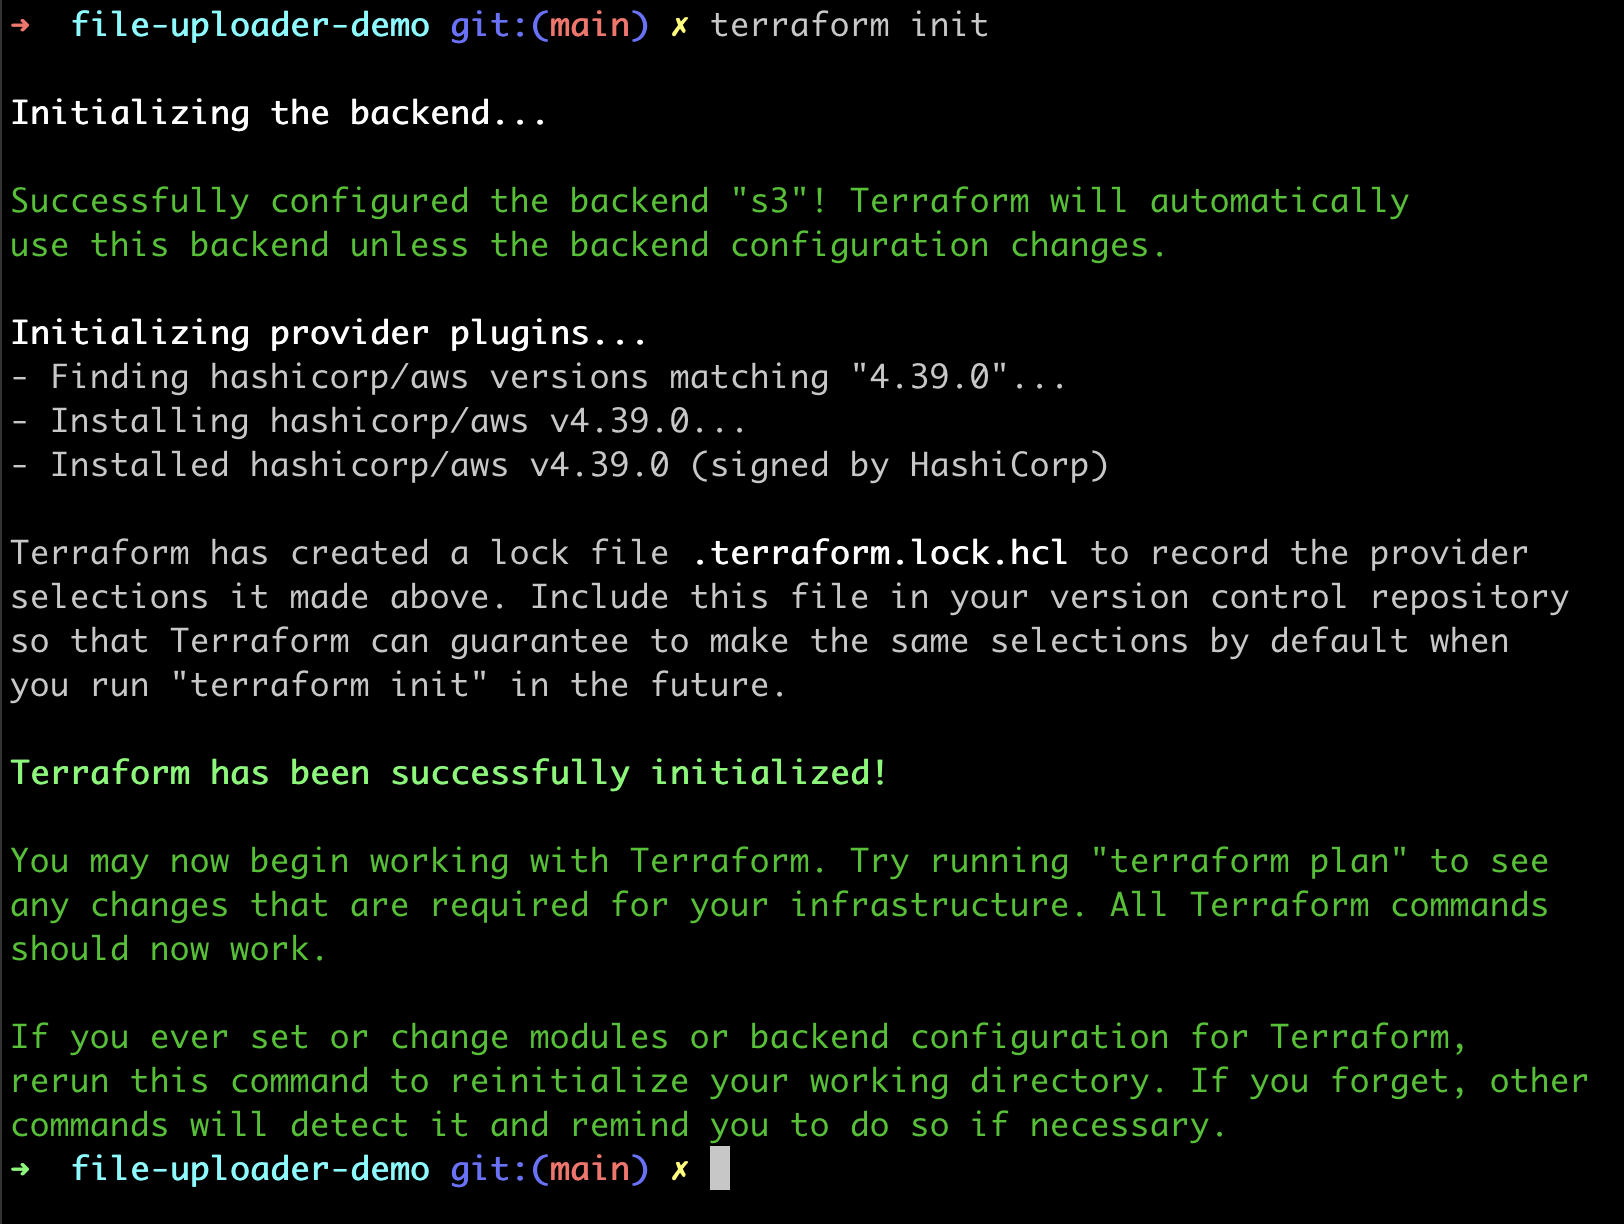
Now, if you run terraform init you should see something similar to this output:
We also want to make sure to add the .terraform folder to our .gitignore:
echo '.terraform' >> .gitignore
Now we can get onto the fun stuff. We need to create a few things in AWS for our app to work:
An IAM user with an access key and secret that our app will use when it's deployed to Vercel.
An S3 bucket that we will use for our file uploads
Some permissions and policies around our app being able to work with our s3 bucket
# main.tf

terraform {
  required_providers {
    aws = {
      source = "hashicorp/aws"
      version = "4.39.0"
    }
  }
}

terraform {
  backend "s3" {
    bucket = "danoph-file-uploader-demo-terraform"
    key    = "terraform.tfstate"
    region = "us-east-1"
  }
}

locals {
  upload-bucket-name = "danoph-file-uploader-demo"
}

resource "aws_s3_bucket" "uploads" {
  bucket = local.upload-bucket-name
}

resource "aws_s3_bucket_server_side_encryption_configuration" "uploads" {
  bucket = aws_s3_bucket.uploads.bucket

  rule {
    apply_server_side_encryption_by_default {
      sse_algorithm     = "AES256"
    }
  }
}

resource "aws_s3_bucket_cors_configuration" "uploads" {
  bucket = aws_s3_bucket.uploads.id

  cors_rule {
    allowed_headers = ["*"]
    allowed_methods = ["GET", "PUT", "POST"]
    allowed_origins = ["*"]
    expose_headers  = ["ETag"]
  }
}

resource "aws_iam_user" "vercel" {
  name = "file-uploader-demo"
  path = "/system/"
}

resource "aws_iam_access_key" "vercel" {
  user = aws_iam_user.vercel.name
}

resource "aws_iam_policy" "s3_access" {
  name        = "vercel_file_uploader_demo"
  path        = "/"
  description = "IAM policy for s3 access from vercel"

  policy = <<EOF
{
  "Version": "2012-10-17",
  "Statement": [
    {
      "Action": [
        "s3:PutObject",
        "s3:GetObject",
        "s3:ListMultipartUploadParts"
      ],
      "Resource": "arn:aws:s3:::${local.upload-bucket-name}/*",
      "Effect": "Allow"
    }
  ]
}
EOF
}

resource "aws_iam_user_policy_attachment" "s3_access" {
  user       = aws_iam_user.vercel.name
  policy_arn = aws_iam_policy.s3_access.arn
}

output "access_key_id" {
  value = aws_iam_access_key.vercel.id
}

output "access_key_secret" {
  sensitive = true
  value = aws_iam_access_key.vercel.secret
}
To see what's going to be created in AWS, we can run the following command to do a dry run in terraform:
terraform plan
You will see the s3 bucket, IAM user and policy, etc. about to be created. When you're ready to make the changes, run:
terraform apply
It will ask you if you're sure you want to make these changes by typing yes. When I am using terraform in the real world, I make sure to review the plan before typing yes whenever I am making changes. Many times I have seen people not look closely enough at what terraform is about to do and they end up accidentally deleting a production database server, which can cause weeks worth of work if there aren't backups or redundancy set up. That's just a tip from me for your future terraform endeavors to review the plan before actually typing yes :)
Anyway, when the vercel IAM user gets created when running this terraform, make sure to copy the access key id somewhere safe. Since we marked the access_key_secret output as sensitive, we need to explicitly run this command to see the output value:
terraform output access_key_secret
Now that we have everything set up in AWS, let's switch over to Vercel and get everything set up over there. We will need to make sure our app is pushed up to GitHub first. After that, we can visit vercel and import our new repository:
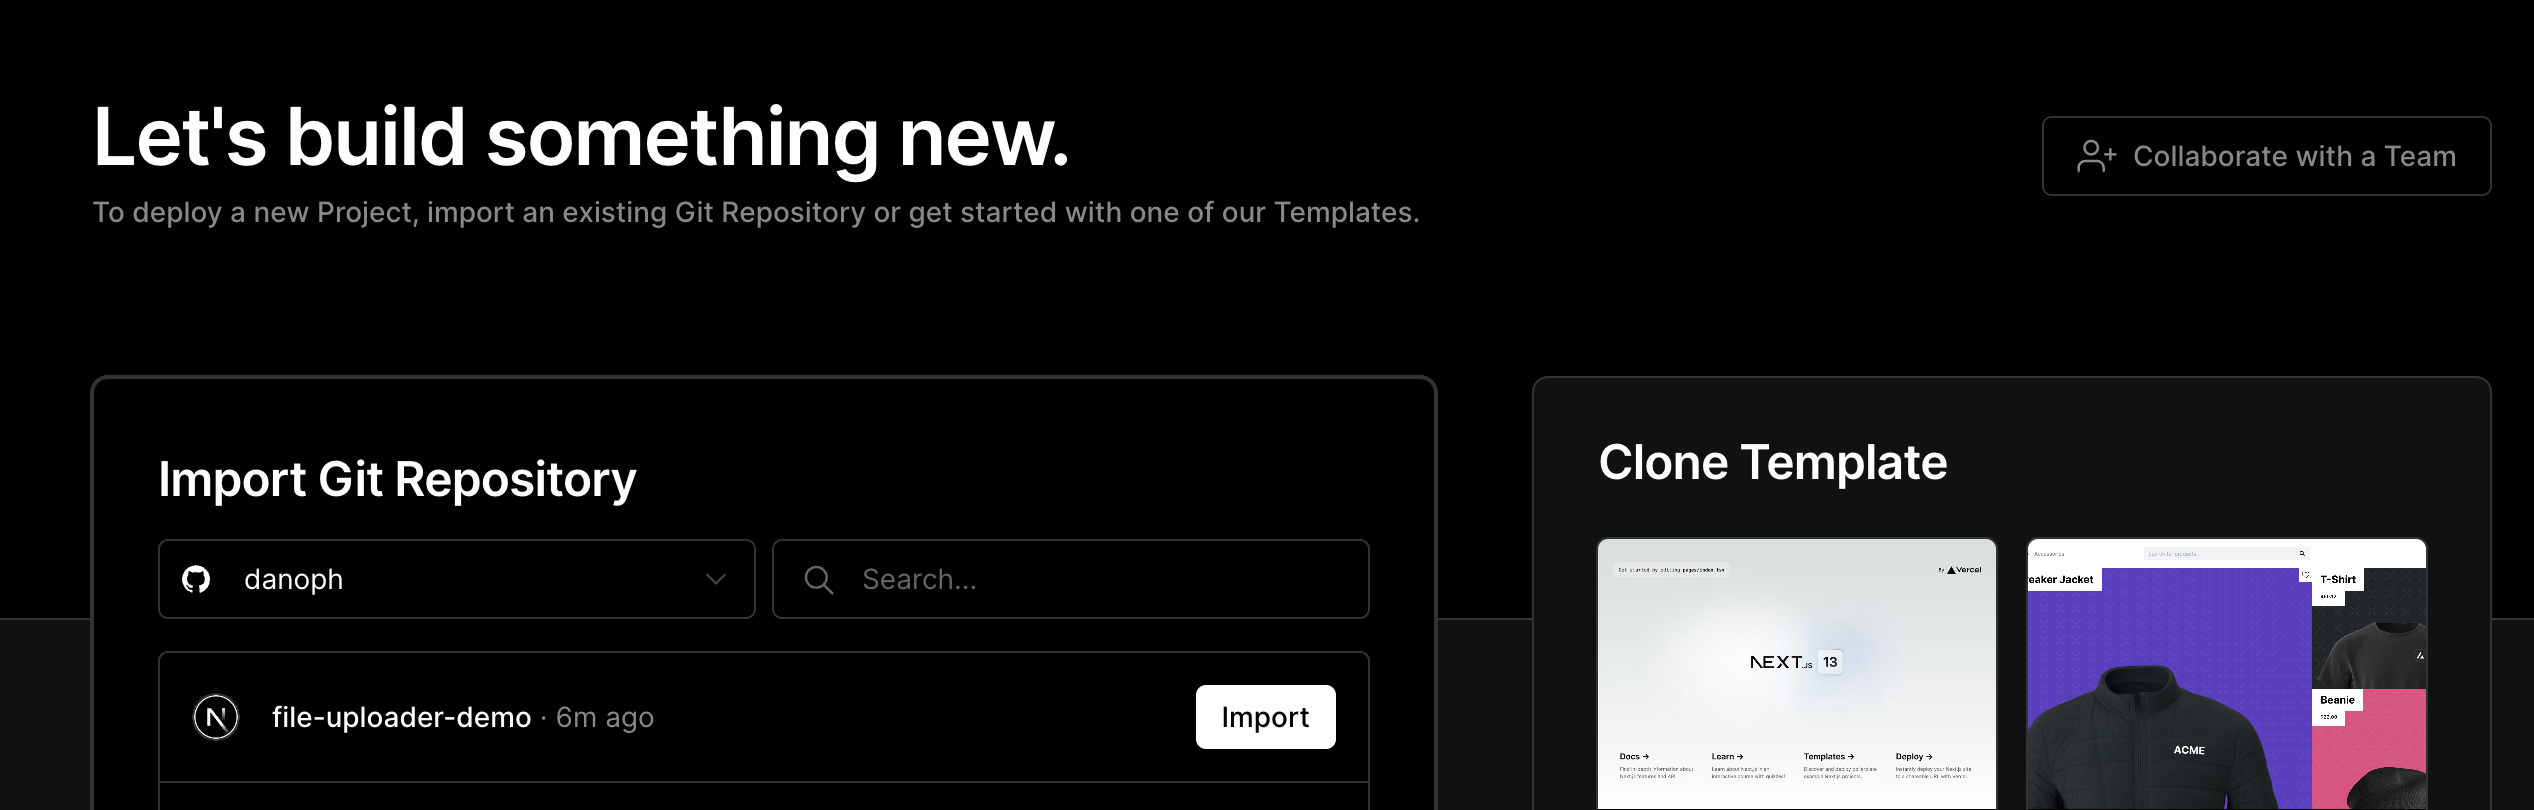
Click on "Import" next to our repository. On the next page, we will need to add 4 environment variables that our lib/s3.ts file is referencing:
bucket_regionupload_bucketaccess_key_idaccess_key_secret
Vercel will automatically inject these values into our application that our application is referencing using process.env. This is good practice to avoid hardcoding secrets and passwords in applications. You'd be shocked to know how many projects I've seen that hardcode usernames and passwords directly into the codebase.
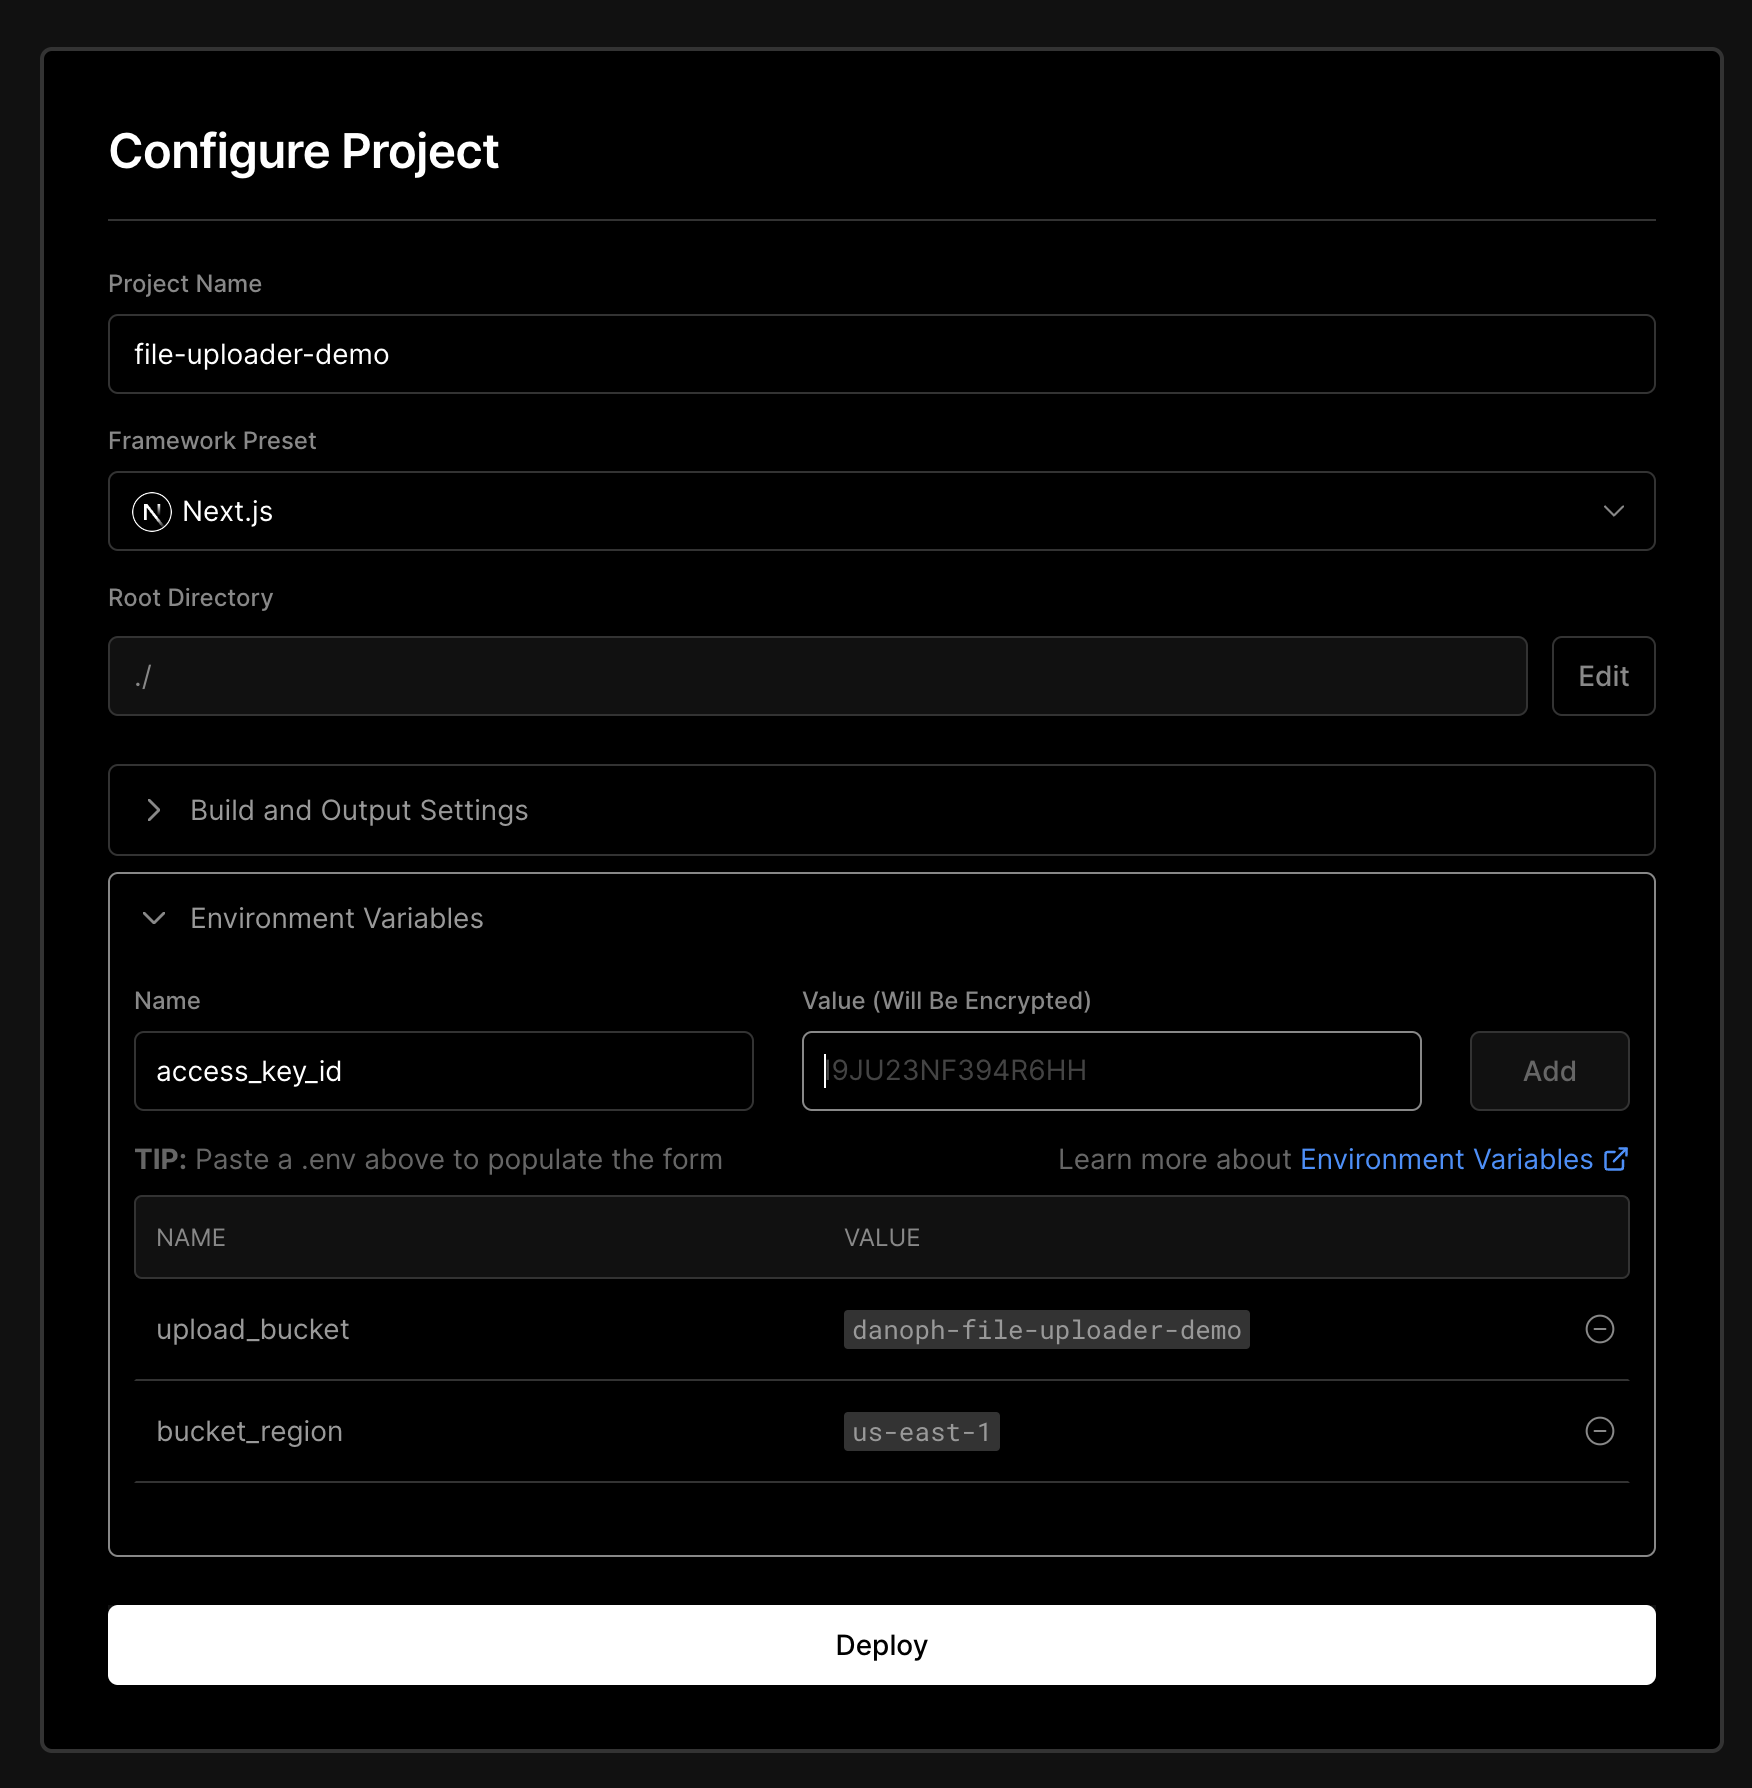
I purposely am not showing the values for access_key_id and access_key_secret since they are displayed in plain text. Just make sure to enter all 4 values and then click "Deploy"
After the successful deployment, you should be able to visit the domain vercel assigns your app:
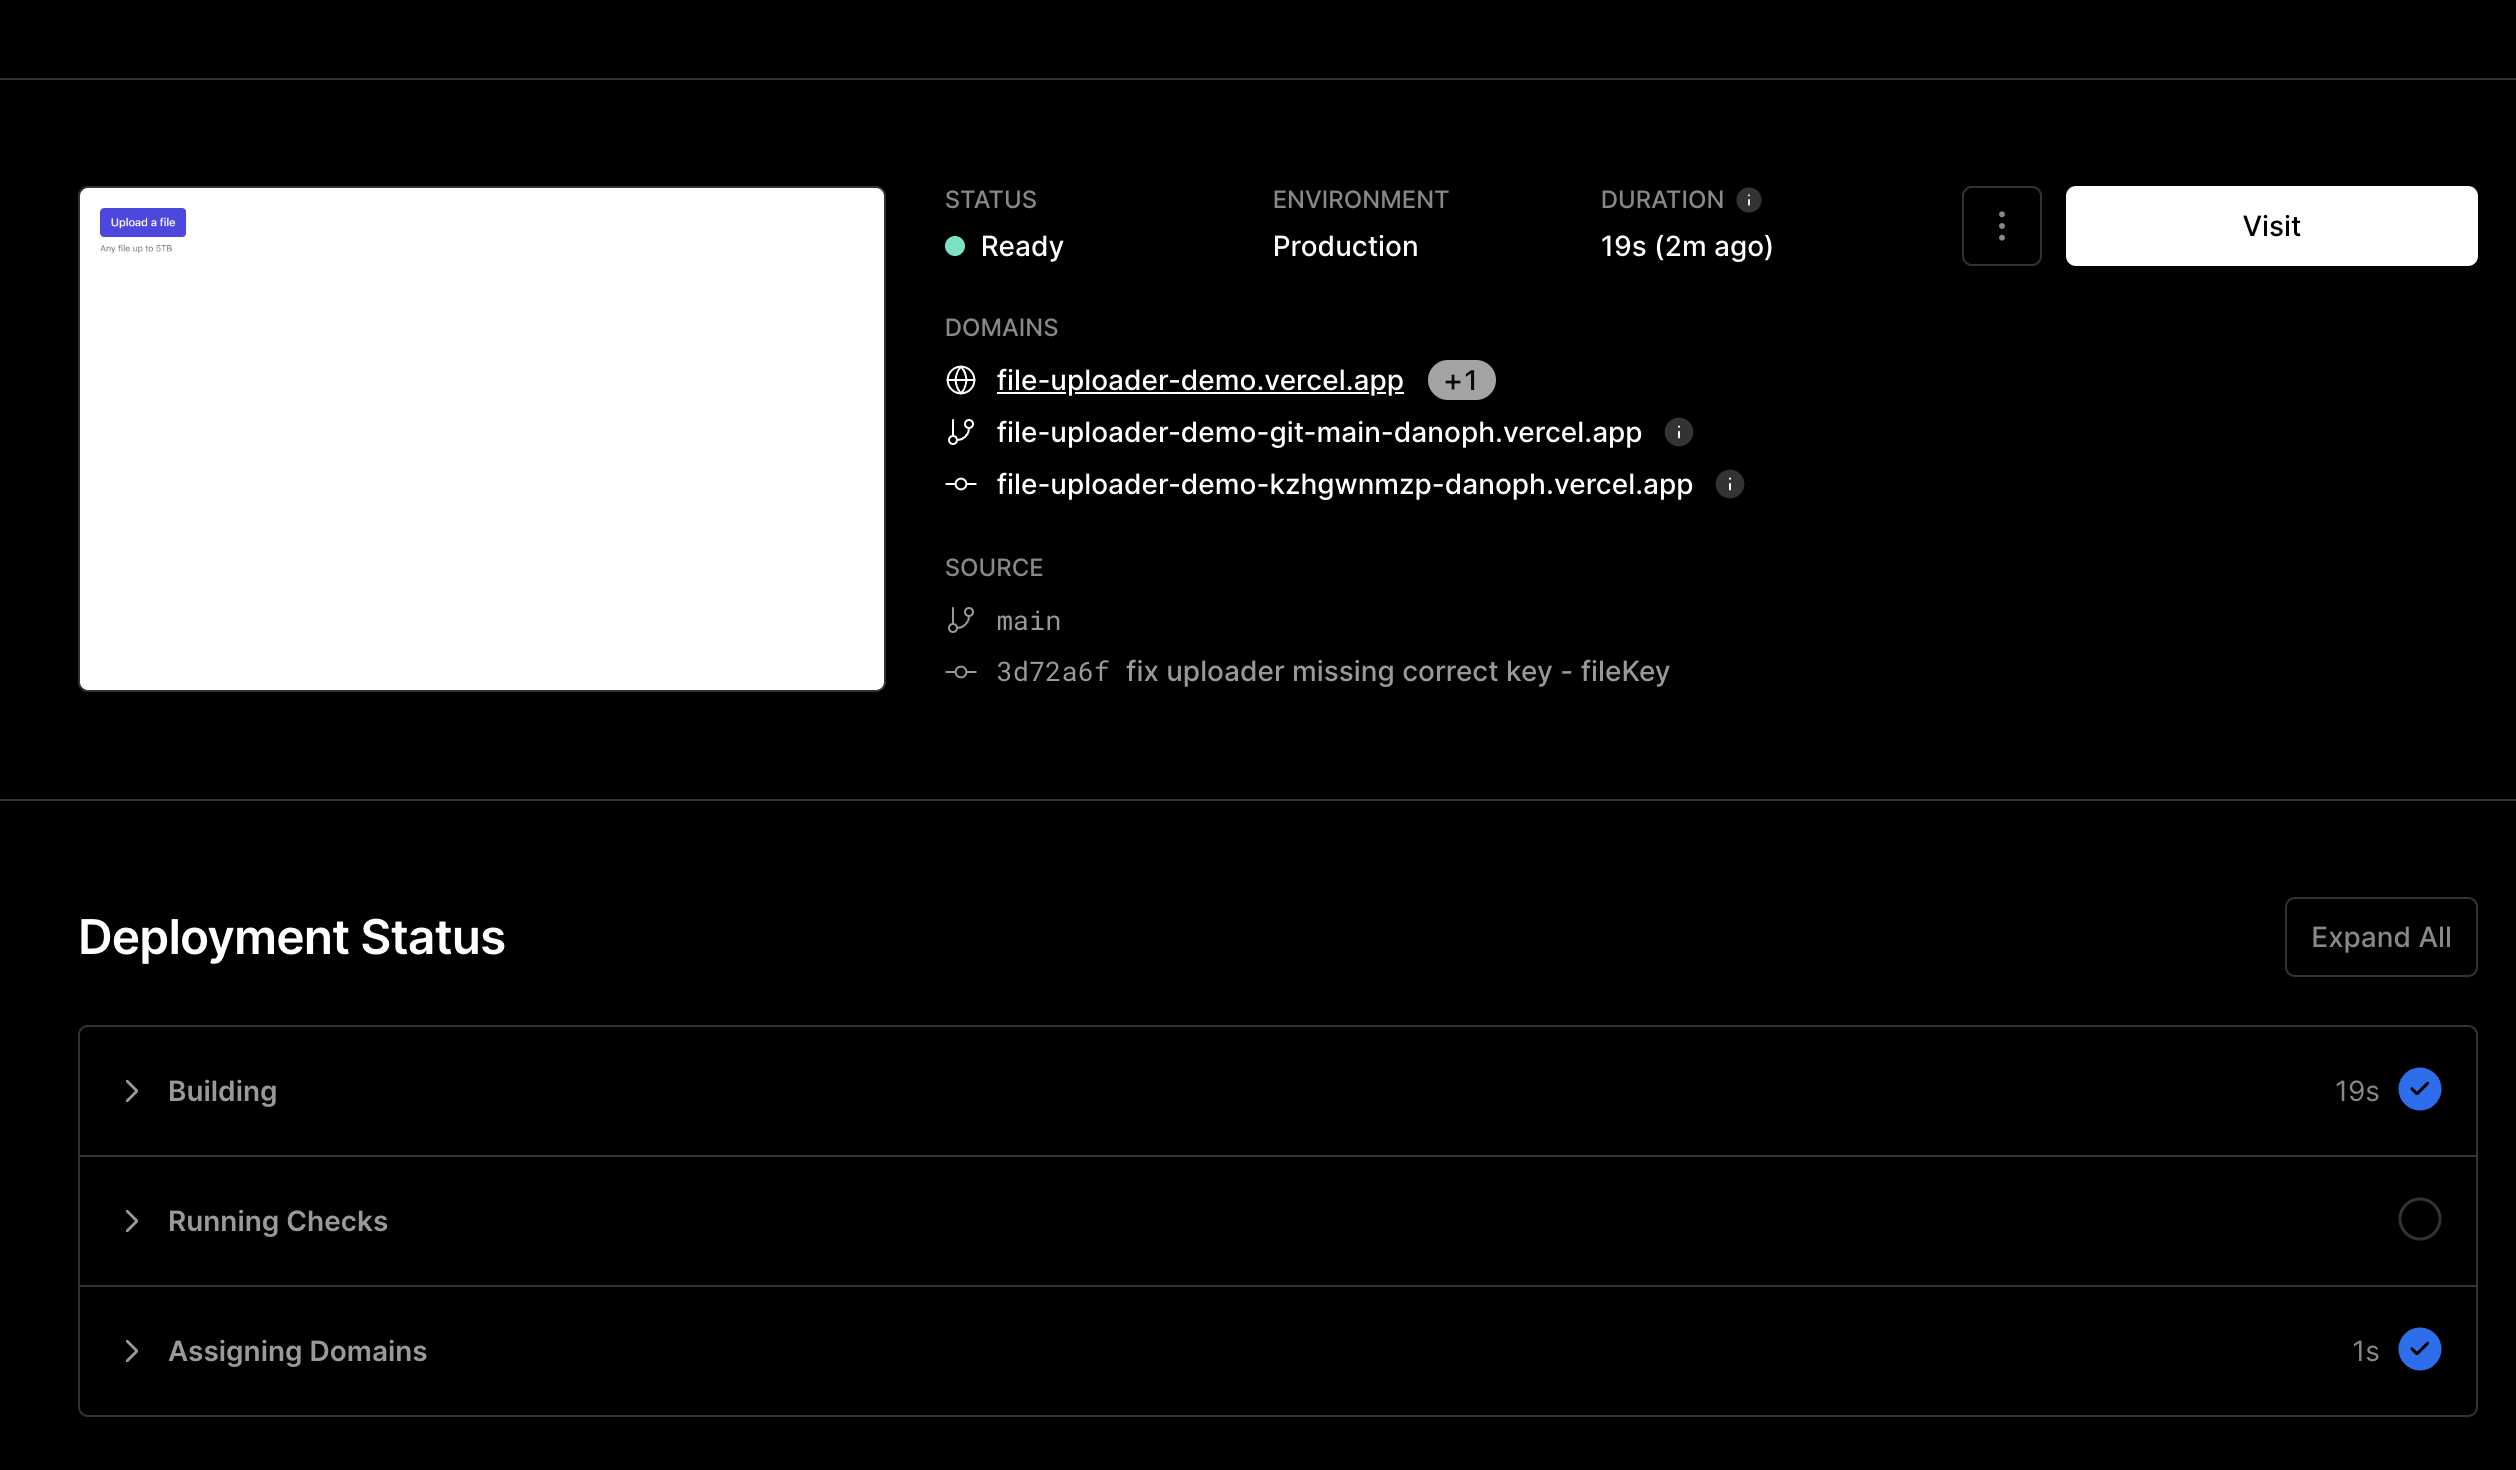
Once you visit the app, open up the developer console so you can see upload progress when uploading a file. Then click on the "Upload a file" button and watch the developer console for the upload to finish.

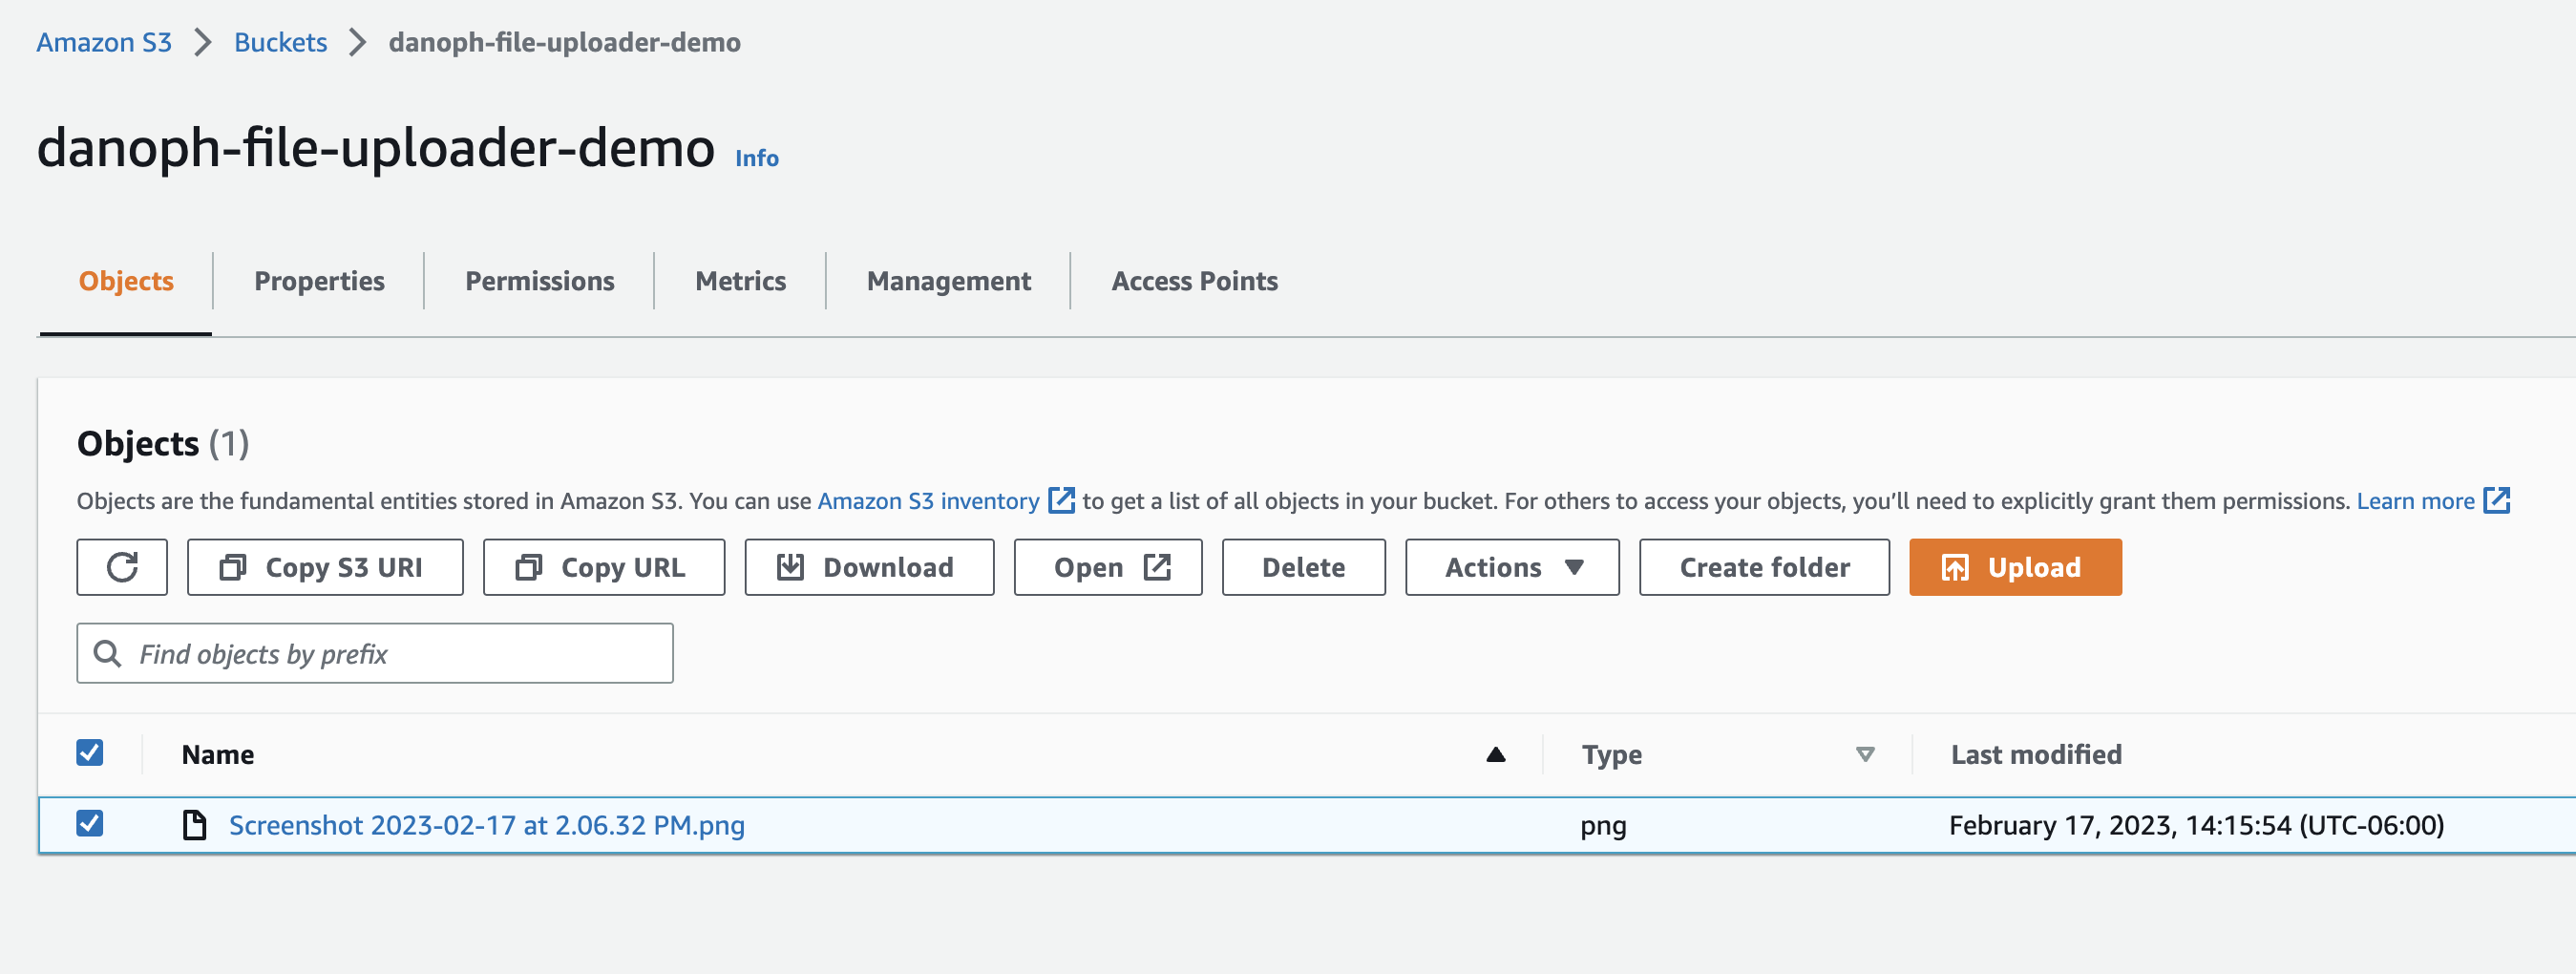
Now, if you head over to your S3 bucket in the AWS Console, you should see a new file has just arrived.
And there you have multipart chunked uploading directly to Amazon S3 from scratch!
If people are interested in knowing more about this topic, let me know in the comments. Since we aren't displaying the images on the page currently, we could walk through a way to display the files served through a CDN like CloudFront, or we could possibly explore expanding our single file uploader into a multiple file uploader.
The full source code for this application is here: https://github.com/danoph/file-uploader-demo